Netcash Debit Order (formerly SagePay direct debit)
Netcash Debit Order is a Splynx add-on (previously SagePay direct debit), used to generate debit orders and is processed via https://netcash.co.za/.

Add-on Installation
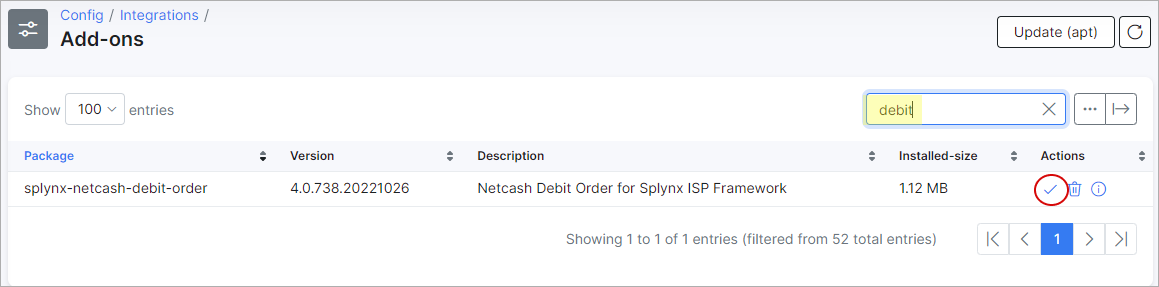
To install Netcash Debit Orders, navigate to Config → Integrations → Add-ons:
![]()
Locate the Netcash add-on and click on the install button as on the screenshot below:
Alternatively, the add-on can be installed using the following commands via a terminal on your server:
apt update
apt install splynx-netcash-debit-order
Netcash Account Registration
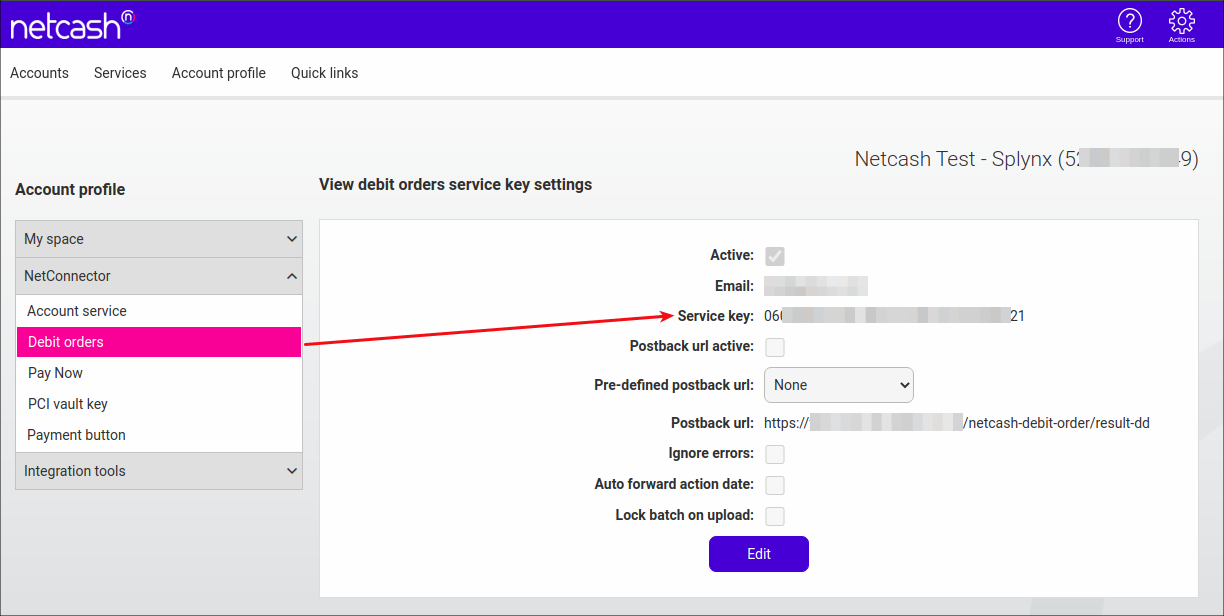
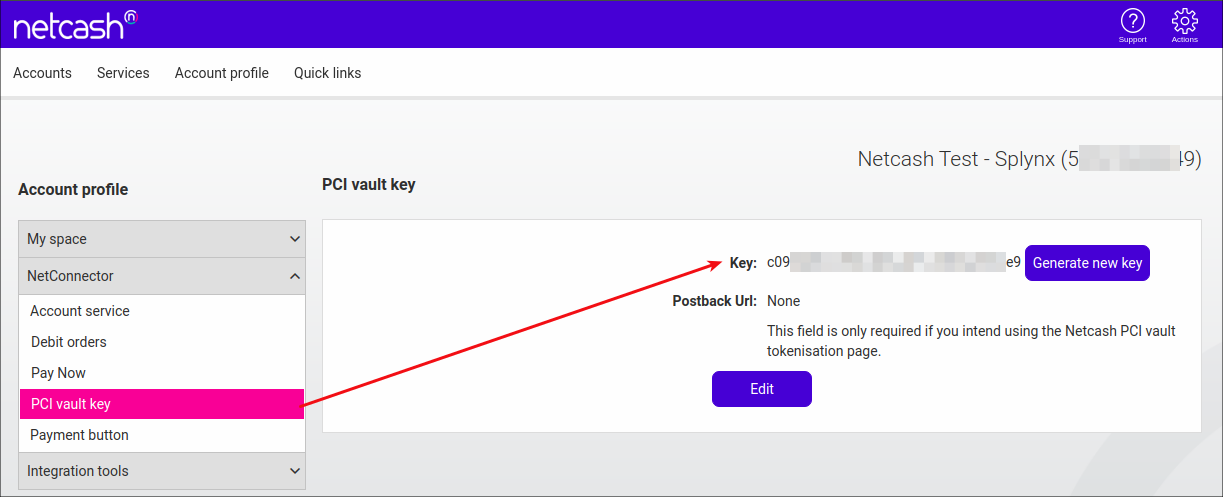
When the installation has completed, you need to register with Netcash and configure your account:
Account service key:

Debit orders service key:
PCI vault key:
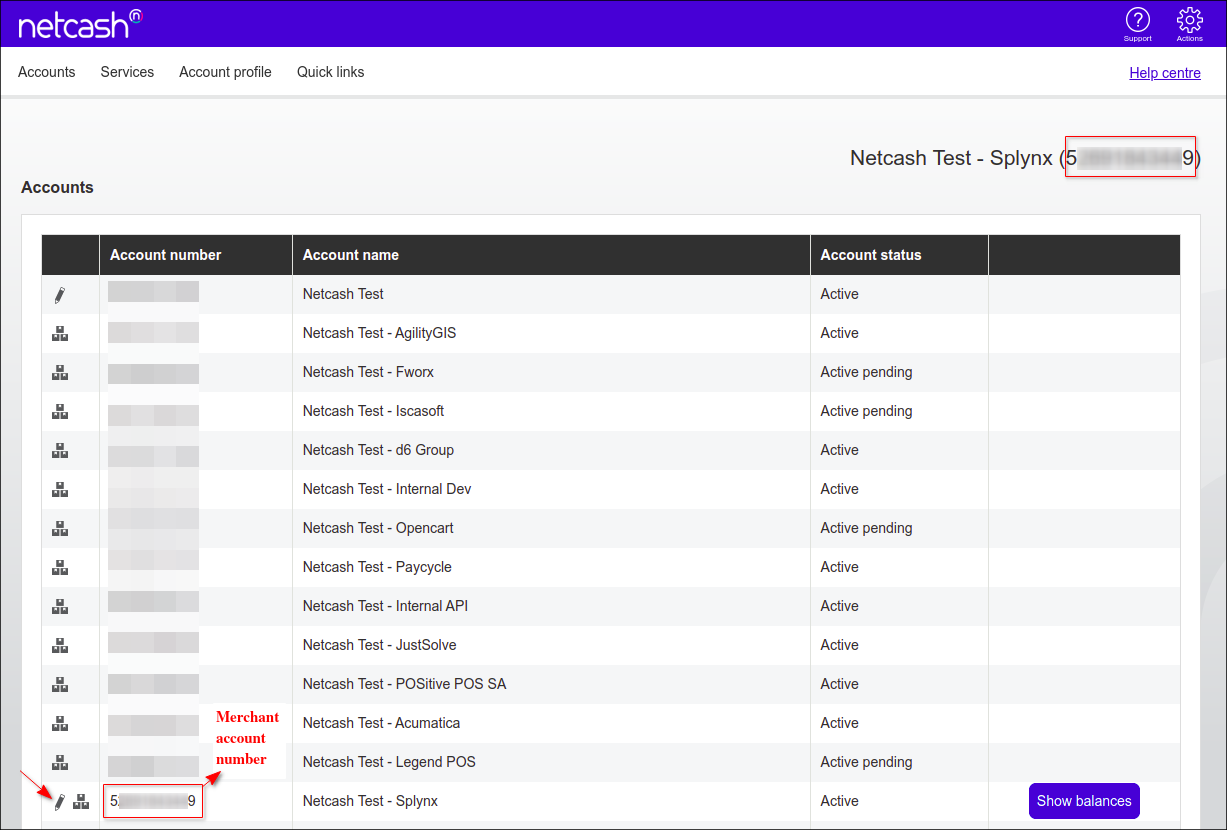
And your Merchant account number:
Add-on settings
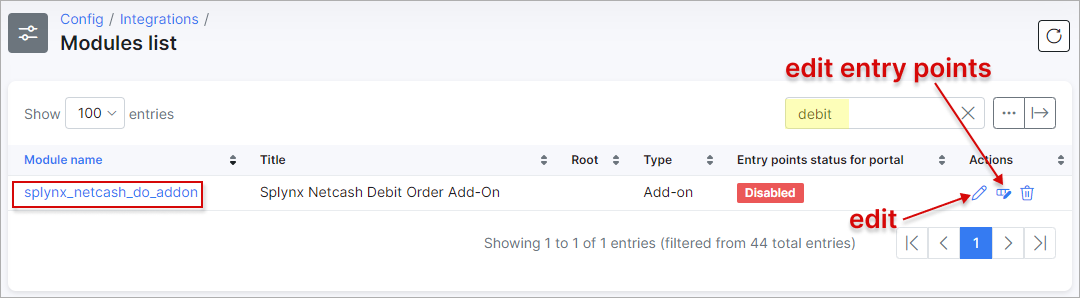
The values above have to be added to the Partners settings section of add-on configuration, located in Config → Integrations → Modules list.

Locate or search for the splynx_netcash_do_addon item and click on the

Main information
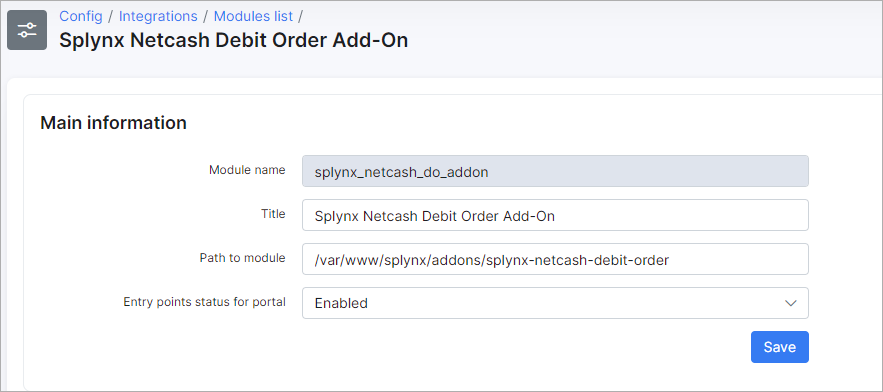
- Module name - the module name in the system (for view only);
- Title - the module title;
- Path to module - path to the module file;
- Entry points status for portal - if enabled, the add-on will be available for the Customer portal.
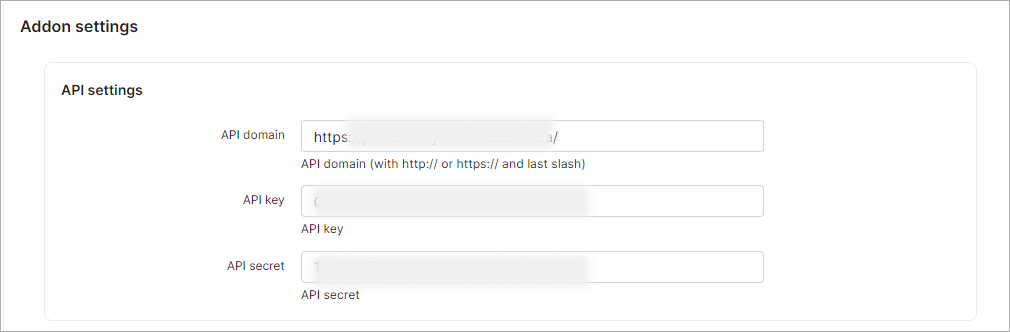
Addon settings
API settings
-
API domain - api domain should be the same as the Splynx URL. The forward slash
/is required at the end; -
API key, API secret - auto generated default values. Don't change it unless it is absolutely necessary.
Netcash Debit Order settings


-
In the Admin roles field, you can choose which build-in roles will have access via the admin panel to
Finance → Netcash Debit Order check payments. The following roles can be specified in the field admins roles:super-administrator,administrator,manager,financial manager,customer creator,engineerandtechnician.
super-administrator,administratorandmanagerare selected by default in the drop down list after add-on installation. It means that the admin account with any of these roles always has access toFinance → Netcash Debit Order check paymentsmenu (account's permissions to Finance module and Netcash Debit Order add-on are required as well).

In Splynx v3.1, the names of admins roles cannot be selected from a drop-down list, you should write them into the field manually if it's empty, each role should be separated by comma without spaces.
For example:
administrator,super-administrator,manager,engineer

technician role and this role was not set in the add-on config, the access to Netcash Debit Order check payments menu for such admin will be forbidden.
- In order to disable the payments sync from
Netcash → Splynx(e.g. you configured the payments sync from SageOne to Splynx), you can use the Disable payment processing by system option. If the toggle isenabled- cron will not sync payments to Splynx from Netcash side; if it'sdisabled- payments will be synced into Splynx;
 .
.
Notifications settings
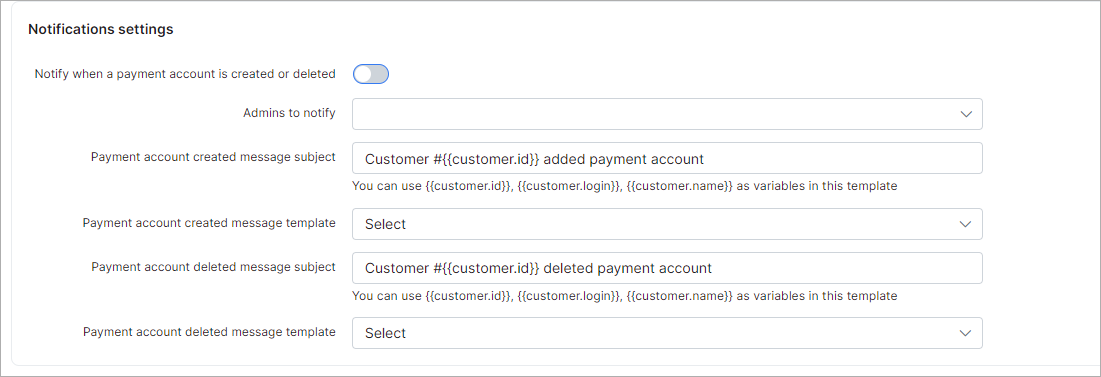
Administrators can receive notifications when a customer has created a Netcash payment account. To enable this feature, use the Notifications settings provided.
Partners settings

-
PCI vault key - this key is only needed when customers use their own credit cards to pay;
-
In case of the multiple Partners scheme, you can divide Netcash configuration between them. Create a new partner in Splynx, in Netcash config select the necessary partner and set the required settings. Pay attention, the fields marked with
*sign have the different values from original ones (original values are related to Default partner); -
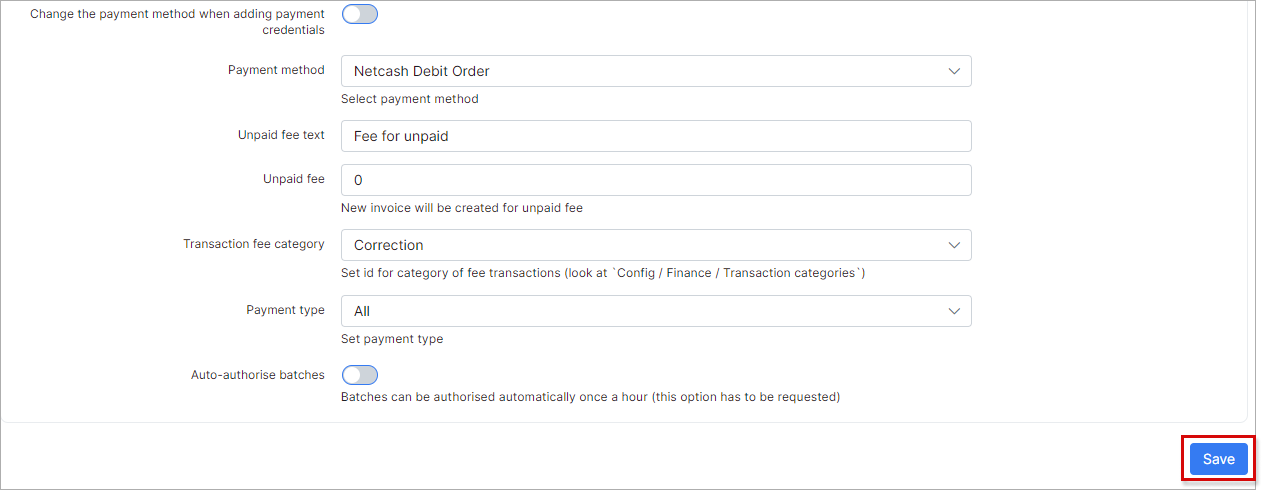
The Netcash Debit Order add-on supports the Batch Auto Authorise function which allows the Splynx system to authorise batches automatically (once per hour) without manual/human intervention during the invoice payment. To turn on this functionality, please enable the
Auto-authorise batchestoggle in the add-on configuration page and pressSavebutton:

The Batch Auto Authorise function is available on request and access is only granted by Netcash management approval. Use this link to send a request.
'Auto-authorise batches' explanation
In case you do not use the Batch Auto Authorise function, we have the following concept: the customers pay invoices, these payments are sent to Netcash side as batch files. After that, the administrator, at some intervals, logs into the Netcash account and manually authorizes all customers' payments. The Netcash, for its part, does a final check of such payments and provides the results; Splynx checks the Netcash output results by cron and we get the final status of the payments.
If the access is granted and Batch Auto Authorise function in enabled in Splynx, the concept will be as follows: the administrator no longer needs to log in and authorise the batches in the Netcash account manually. Splynx will send the request to Netcash once per hour in order to receive a list of all currently unauthorized payments and re-send requests to Netcash again to authorise them.
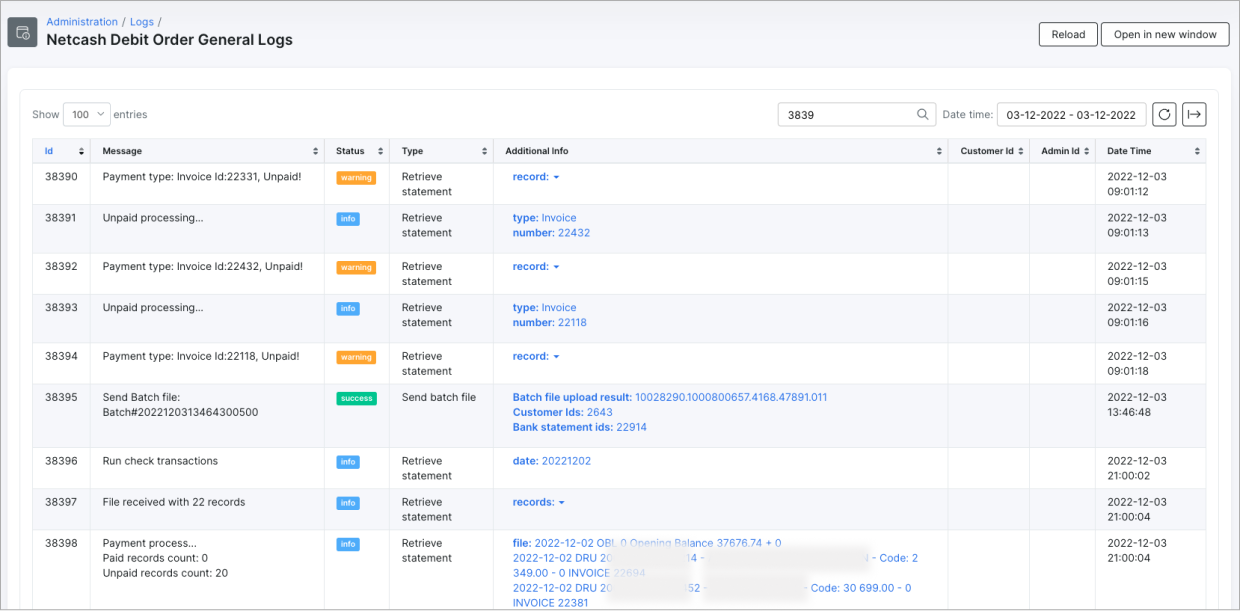
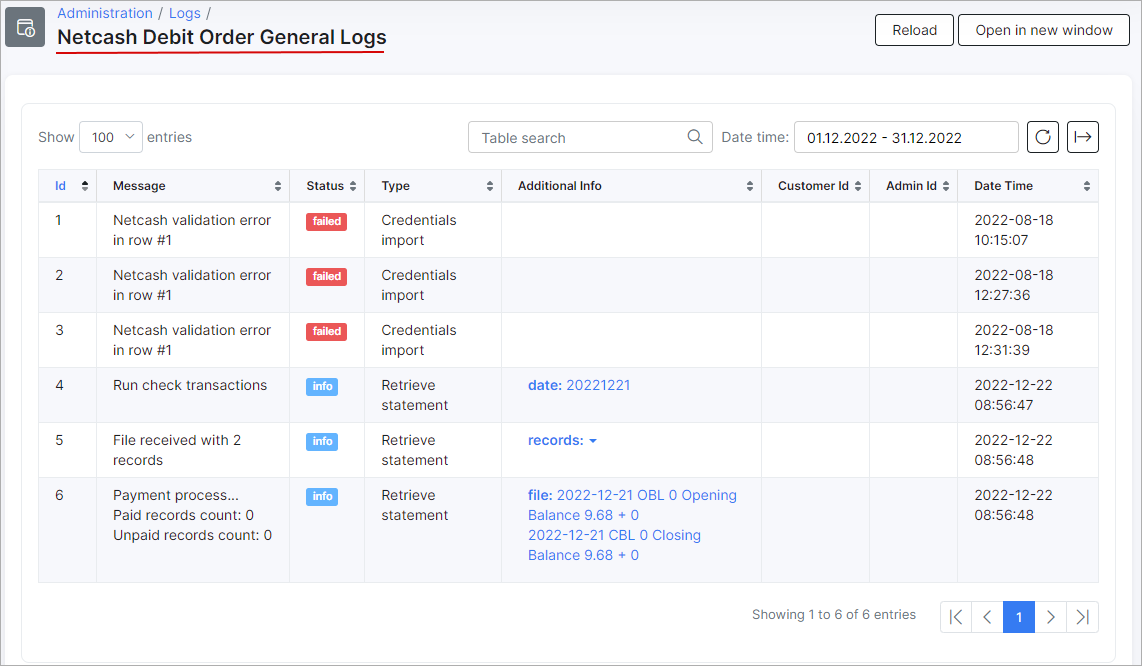
The log records about the batch file(-s) authorization can be found in Administration → Logs → Netcash Debit Order General Logs:
Netcash Payment Account and Invoice Charge
To add the Netcash payment account, navigate to the customer's Billing tab, and click on the card icon in the Payment accounts window.


It's recommended to use the card icon ![]()
In this section, the admin can add the Netcash payment account credentials to the customer profile with the provided bank account or credit card details.
Also, the payment account can be added by clicking on the ![]()
Moreover, the Netcash payment account can be added from customer's Portal as well:

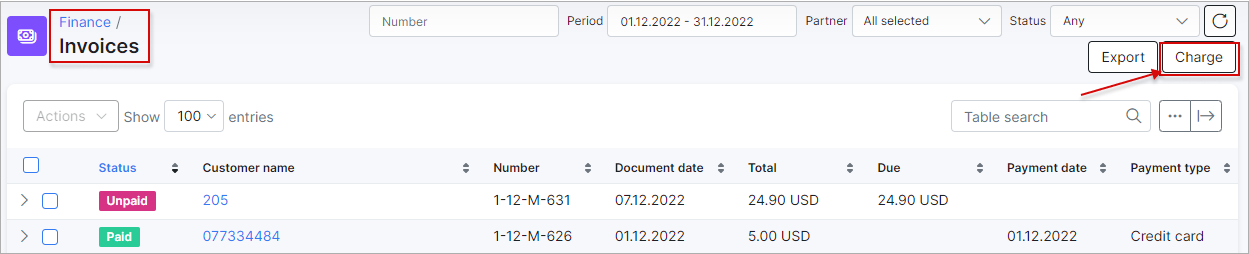
When customers have the Netcash payment accounts configured, the admin can charge their invoices all at once.
To perform the charge of Unpaid invoices, navigate to Finance → Invoices on the sidebar:
| General information - how the Charge of invoices works | |
|---|---|
| 1 | The admin charges the invoices in Splynx. Once the charge is successful, the payment statements and batch files will be created and sent to the Netcash gateway and the charged invoices will change their status to Pending |
| 2 | On the Netcash side it can take up to two days after the action date to receive the payments as well as non-payments (bounced payments) |
| 3 | Splynx will check the Netcash gateway twice a day for any payments and will allocate them to the correct invoices, in this case the invoices will become Paid. If we receive non-payments, the invoices status will return to Unpaid |
Debit Order Charge Scenarios
- Submit outstanding (due) invoice amounts - use the “netcash-invoices” handler
- Submit outstanding balance amounts - use the “netcash-oustanding-balances” handler - Balance charge preview is not working currently and will be fixed in v4.2 of Splynx
- Submit outstanding balance or outstanding invoice amounts (but be able to edit them in preview window) - This will be available in v4.2 of Splynx
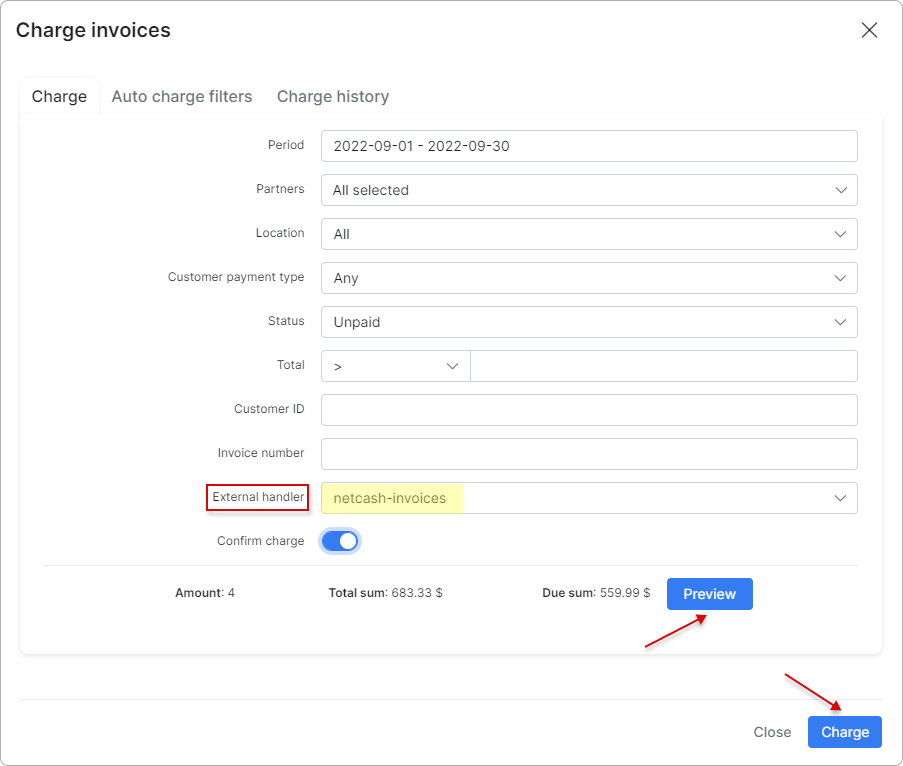
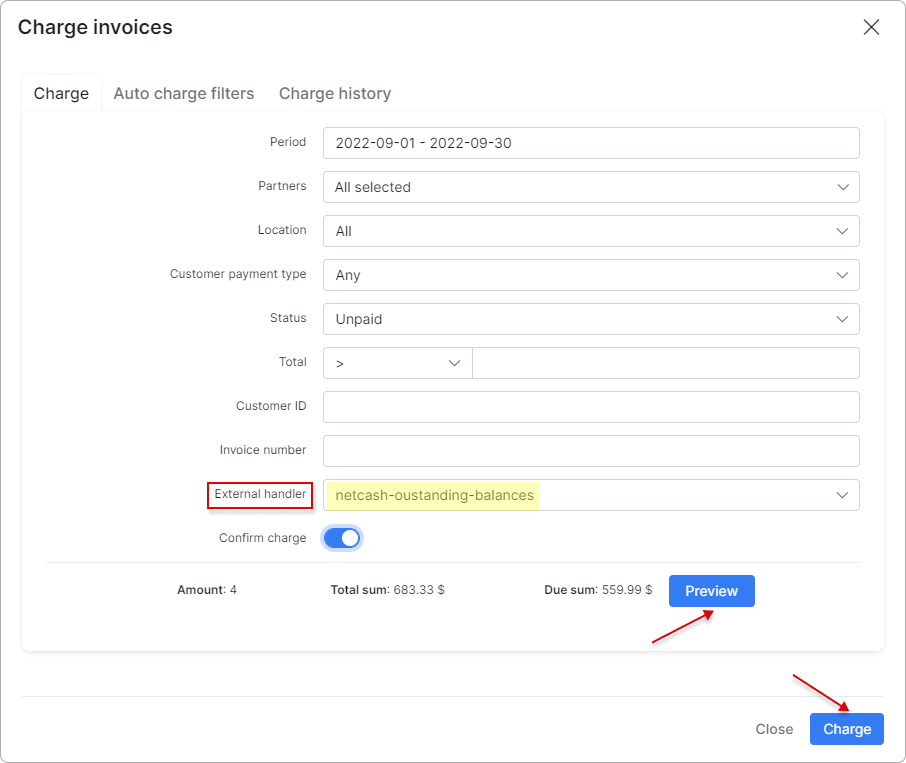
If you charge the invoices using the netcash-oustanding-balances charge handler, the customer will be charged not according to the invoice amount, but with the amount outstanding on the customer’s account.
Example:
A customer has the invoice with the amount of 10, in the current month, but the balance of the account is -100 (it means that the customer didn't pay for 10 months) in this case, the customer will be charged with the amount of 100 and not 10.
That's why, please be very attentive when using the netcash-oustanding-balances charge handler.
Authorizing Debit Order Batches
Once the invoices are charged, Splynx will create and send the debit batch file with the payment details to https://netcash.co.za/. When the file is received on the Netcash side, log in to your Netcash account and navigate to Services → Debit orders → Manage debit orders → Debit batches, in the debit batch list select the correct item, check the detail of the batch for accuracy. Then, press the Authorise button. Select Email or SMS notifications if you would like to notify your customers of the debits to be processed to the accounts.

The next step is to release funds to bank account:
- a) Yes: Netcash will pay the proceeds of the batch less deductions to your bank account when available.
- b) No: Proceeds will be credited to your Netcash account only – this creates an available balance for salary and creditor payments.
After that, Accept the Terms and conditions - the screen will then refresh and display and Authorise button. Click on the Authorise button again. Your batch is now authorized, click Ok. Netcash has processed the file on the selected action date.
Two days or Same day).
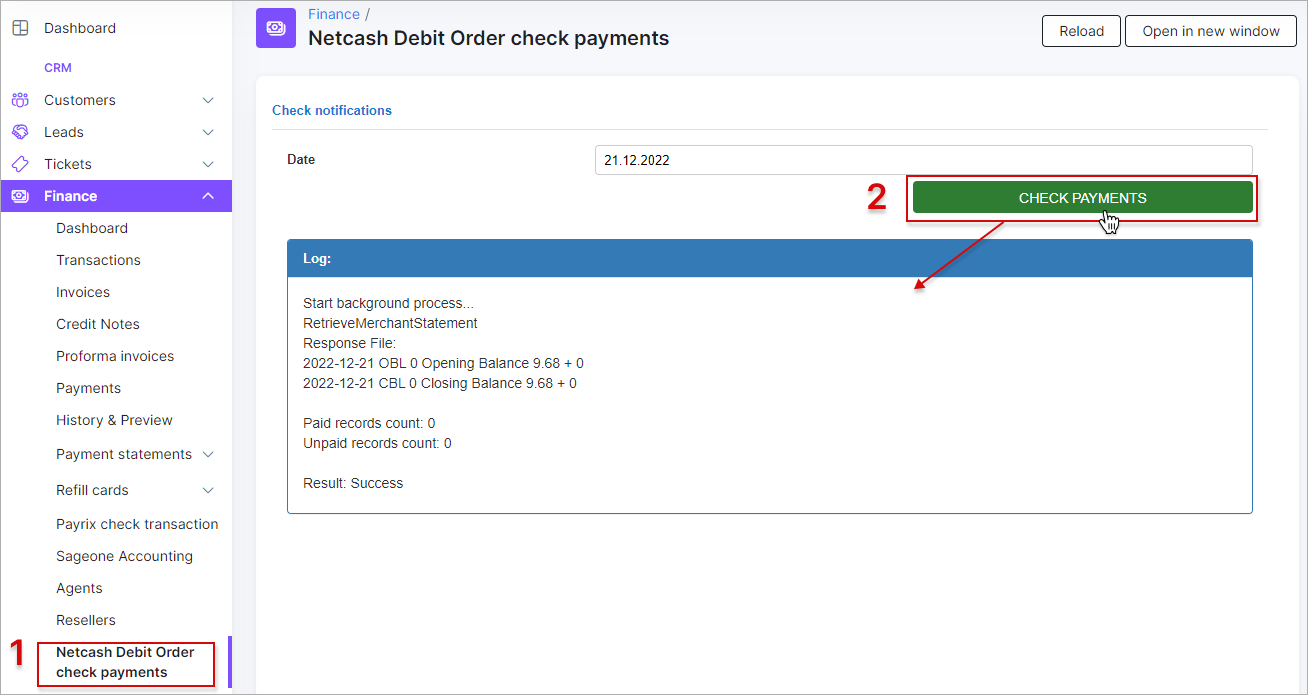
If the toggle of Disable payment processing by system option is disabled, Splynx will send two requests per day (at 00:15 and 12:15) to Netcash via a cron job to retrieve the payments from Netcash. This will auto allocate the payments and update the invoice statuses to Paid.
You can also manually run the check payments for any historic date by using the Netcash Debit Order check payments module in the Finance section on the sidebar:
The charge history can be viewed under the Charge history tab:
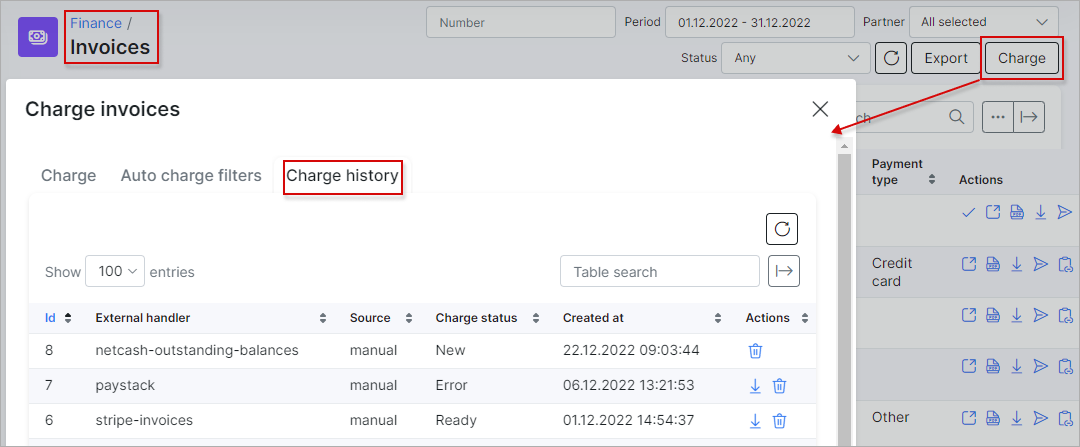
File records with charged invoices can be downloaded or deleted in this section.
The process of invoice charging can be automated. To achieve this, the admin should add the Auto charge filter:
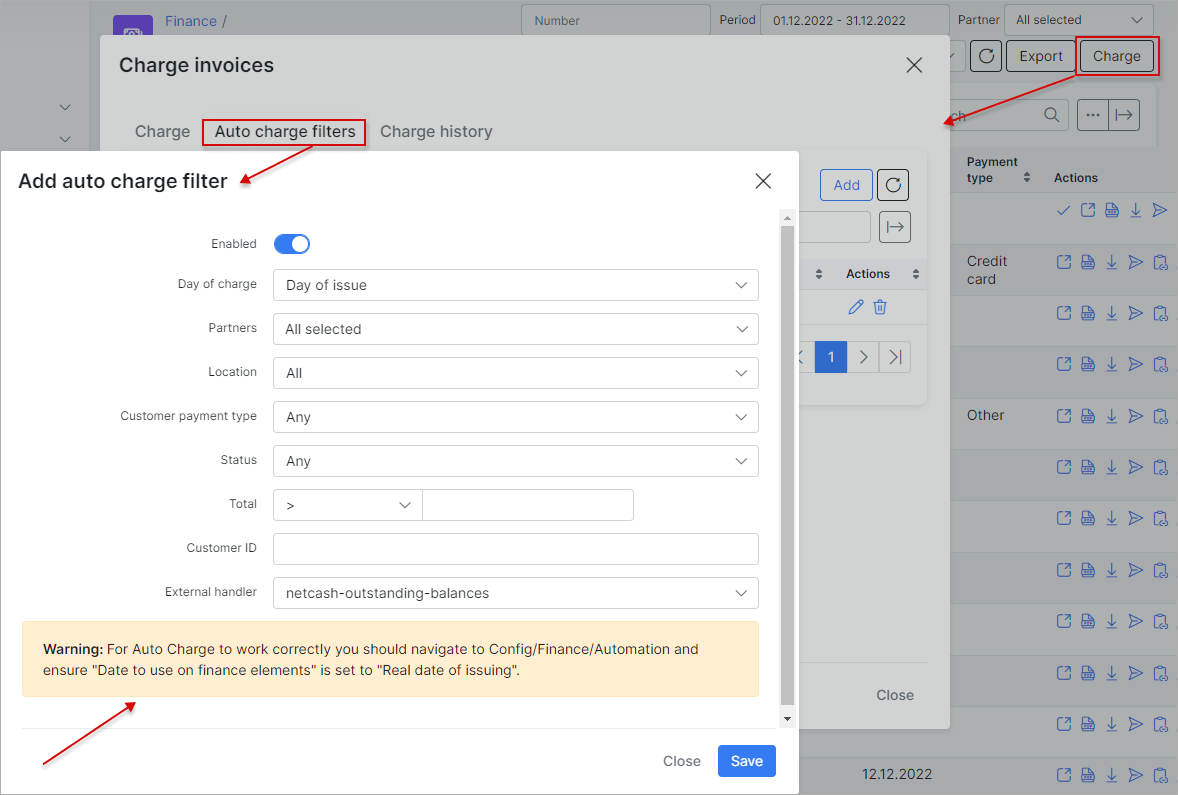
To make Auto Charge work properly you should navigate to Config → Finance → Automation and ensure that the value in the Date to use on finance elements field is set to Real date of issuing.
How to re-invoice
The debit order batch should be deleted in Netcash as well as the relevant payment statement in Splynx (be very vigilant when deleting payment statements as deleting the wrong statement can cause payments not to be auto allocated back to the correct invoices), once completed, invoices can be re-charged.
How do I check if my customers have been successfully charged?
- After the charge was made, go to
Finance → Invoices, press the Charge button and click on the Charge history tab. Use the Search field or click on the column name (e.gId) to sort items and find the latestnetcash_invoices/netcash-outstanding-balancesitem you need. Check its charge status, in case ofErrorstatus, please download the charge history log by clicking on

Open and check the log file, you can easily determine the cause of the error.
The invoice charge log example:
ERRORS:

Error: Customer payment account is empty! - Customer id : 7322

OUTPUT:

Start Netcash Debit Order charging..
type: "invoice"
amount items: 1

Fri, 14 Jan 2022 15:16:52 +0200

Work with invoice with id 2155

Loaded invoice number "202201000151"
Customer id: 7322
Invoice amount: 100
No fee
Total amount: 100
Customer payment account is empty! - Customer id : 7322
- If the latest
netcash_invoices/netcash-outstanding-balancesitem has the charge status asReadyon the tab Charge history in Splynx, but you still cannot validate the payments in Netcash account, please double check your email box registered with the Netcash service.

If there are errors in the Batch file, Netcash sends the email with the errors details to this email box.
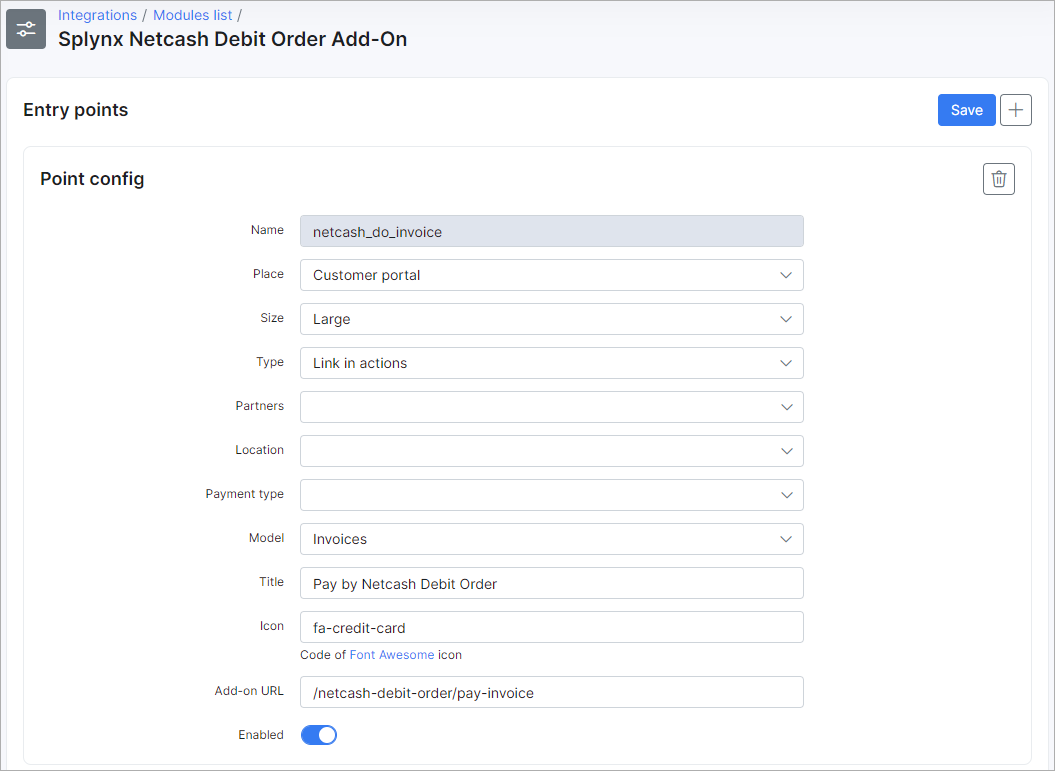
Entry Points Configuration and Invoice Payment on the Customer portal
After installing the Netcash Debit order add-on, customers can pay their (proforma) invoices directly from their Portal page using widgets (entry points).
Make sure that Entry points option is enabled in Main information section of the add-on configuration. Note that changes are not saved until you click on Save.

The configuration of add-on Entry points can be found in Config → Integrations → Modules list, near the splynx_netcash_do_addon module item in Actions column, click on the ![]()

The widgets can be enabled/disabled and updated by partner or location values to make this widget available only for specific partners or locations.
More information about Modules list can be found here.
After the points are enabled, let's navigate to the Customer Portal:

The first entry point allows customers to pay their (proforma) invoices on the Dashboard of the customer Portal.
Another entry point allows payment for a specific invoice under Finance → Invoices:

The customer can also view, update, or remove Netcash account details here:
Finance → Payment statements → History. We use payment statements in Splynx to track and allocate payments to the correct invoices once retrieved.
Direct Payments
Using the direct payments links is the simplest way to accept payments made with a credit card or bank account. This feature is available in the Netcash Debit Order add-on to pay Invoices and Proforma Invoices. This provides convenience and simplicity for your customer, so the amount of on-time payments will increase.
For example, you can add a payment link to the email with the (proforma) invoice, as a result, the customer can make payment quickly by clicking onto this link instead of logging in to their Customer portal page.
In case the customer has saved the payment credentials on the Customer portal, later they do not need to add any further details when using the direct payment link.
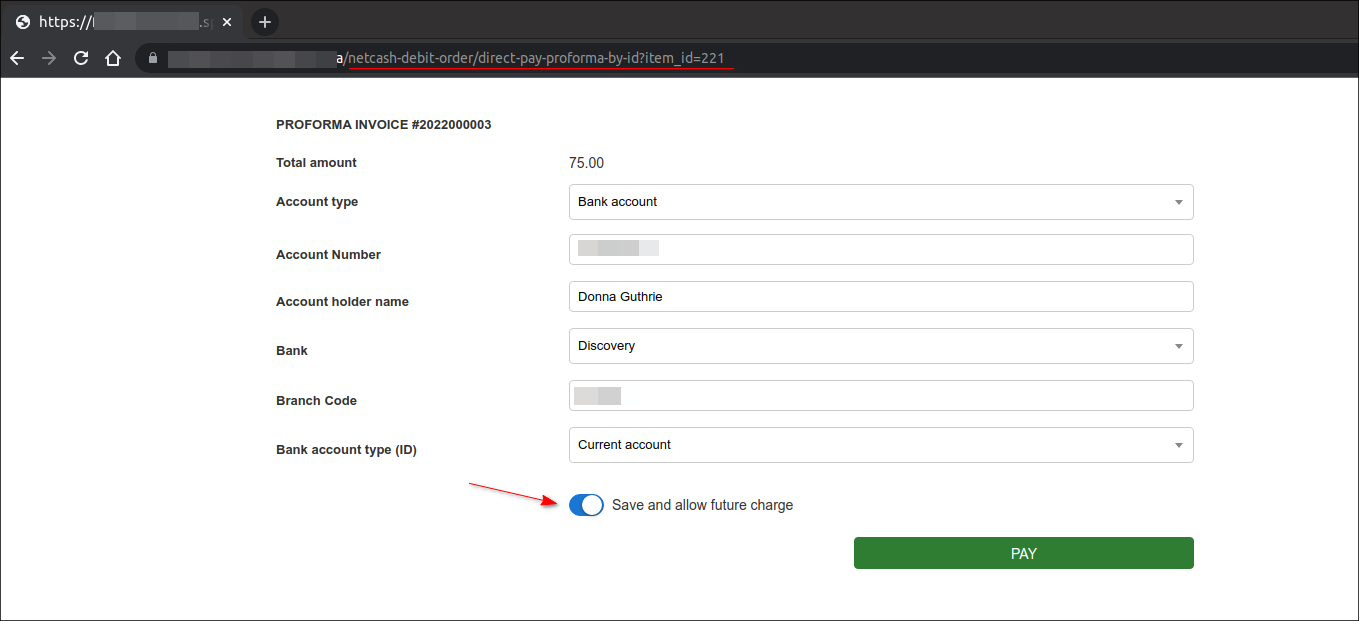
Otherwise, (the customer payment accounts are not saved), the option Save and allow future charge can be used on the direct payment form page to save the customer credit card or bank account credentials on their Customer portal.
To create a direct payment link, please use the patterns below:
To pay the Invoice:
by invoice ID
https://<splynx_domain_address>/netcash-debit-order/direct-pay-invoice-by-id?item_id=<invoice_id>by invoice number
https://<splynx_domain_address>/netcash-debit-order/direct-pay-invoice?item_id=<invoice_number>To pay the Proforma Invoice:
by proforma invoice ID
https://<splynx_domain_address>/netcash-debit-order/direct-pay-proforma-by-id?item_id=<proforma_id>by proforma invoice number
https://<splynx_domain_address>/netcash-debit-order/direct-pay-proforma?item_id=<proforma_number>Examples

Add-on Log Files
The Netcash logs can be found in Administration → Logs:

In General Logs, the different records can be viewed (when the statements were created or when payments were processed, etc):
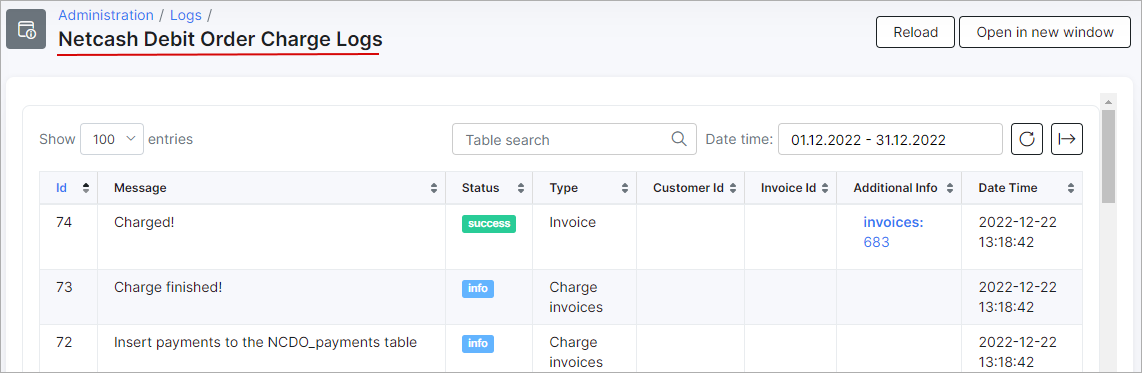
Under Charge Logs only logs regarding charges can be found:
Netcash Debit Order Import
We have created a tool that we use to import account details from the Netcash Master file or any other CSV with the relevant details. We simply require an identifier to match the payment record in the document to the customer on Splynx e.g. an account/reference number or customer name.
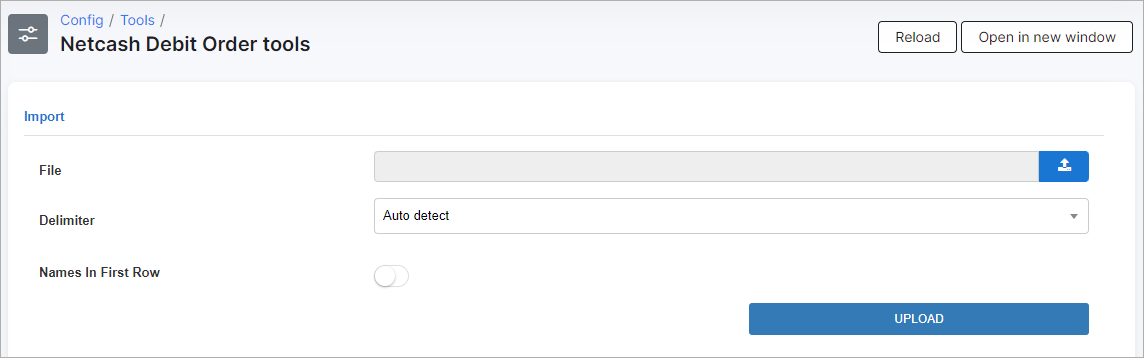
This tool can be found under Config → Tools:

In this section, a CSV file can be uploaded, a delimiter can be selected and finally, the file can be uploaded:
When the data has been uploaded, select the corresponding headers:

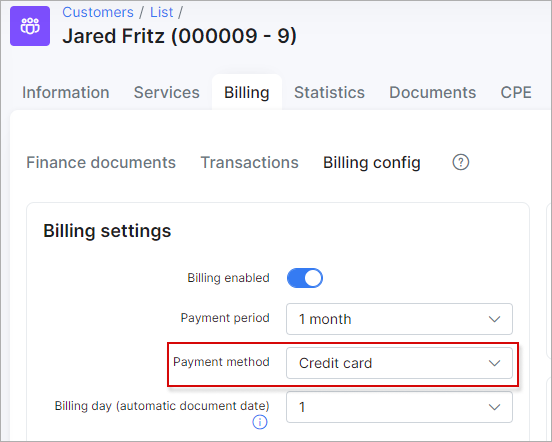
How to change customer's payment method during import
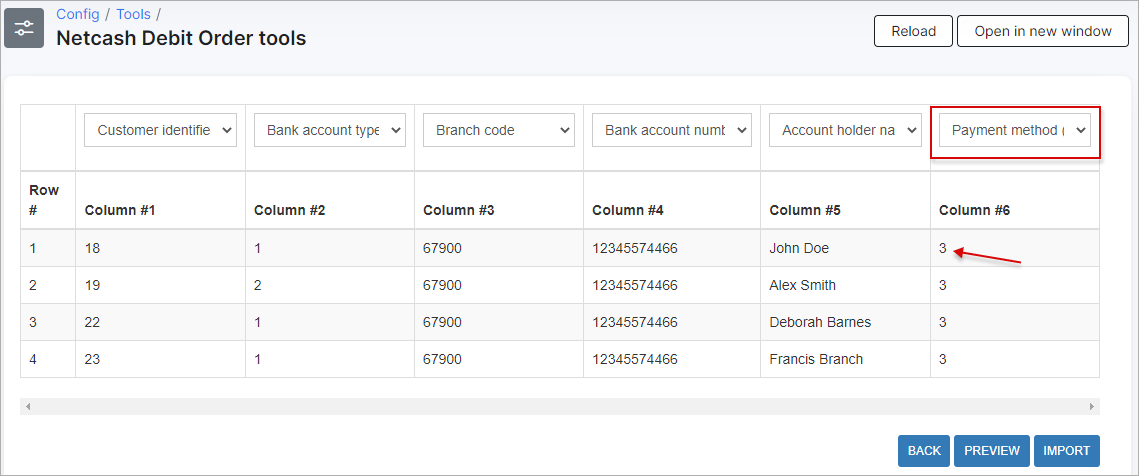
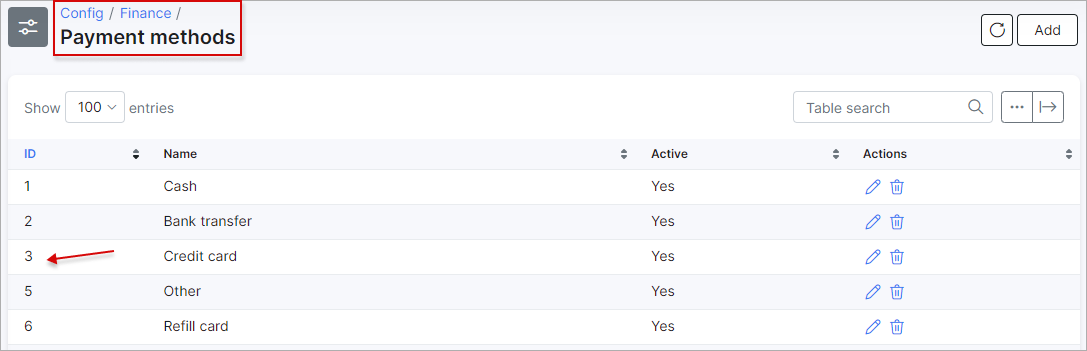
In case Payment method id value is set in CSV file and payment method exists in Splynx, the customer's Payment method (Customers → List → Customer → Billing → Billing Config→ Billing Settings section → Payment method field) will be changed after import.
If Payment method id value is empty in CSV file - the customer's payment method will not be changed.
And, when Payment method id value is incorrect - it will be ignored during import.