

HotSpot add-on
If you look at the reality today, every visitor has a mobile gadget that connects to the public WiFi network in a place where people stay for a few time, such as a hotel, airport, store etc. The use of HotSpot on the router, in addition to providing the Internet, can bring more benefits to the development of your business. In the HotSpot network, the user can authenticate using any web browser, so there is no need to install any additional software to customer end. As the HotSpot login prompt is a web page, the HotSpot service can effectively be used as an advertising technique of your company.
In this guide, we are going to learn how to install the HotSpot add-on in Splynx, configure MikroTik router and how to perform the VulaCoin or Netcash payments feature integration.
Install HotSpot add-on
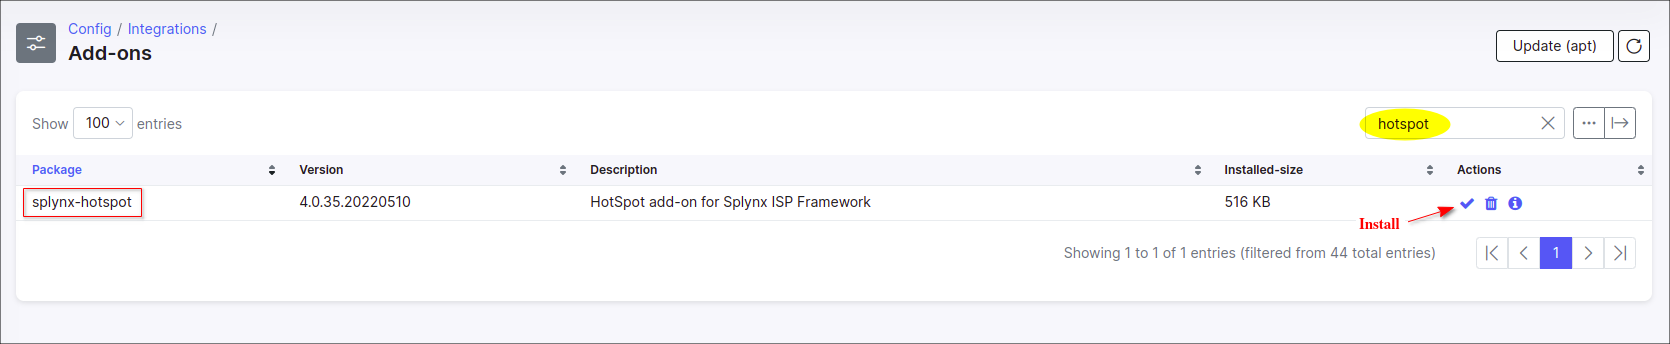
To install the HotSpot add-on, navigate to Config → Integrations → Add-ons:

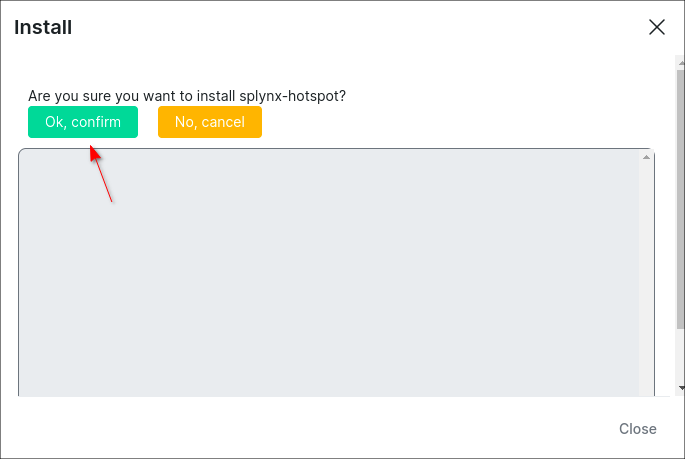
Search the splynx-hotspot add-on item and click on the Install icon located in the Actions column. Click on the OK, confirm button to begin the installation process.
Alternatively, the add-on can be installed using the following commands via the terminal on your Splynx server:
apt update
apt install splynx-hotspot
HotSpot add-on settings
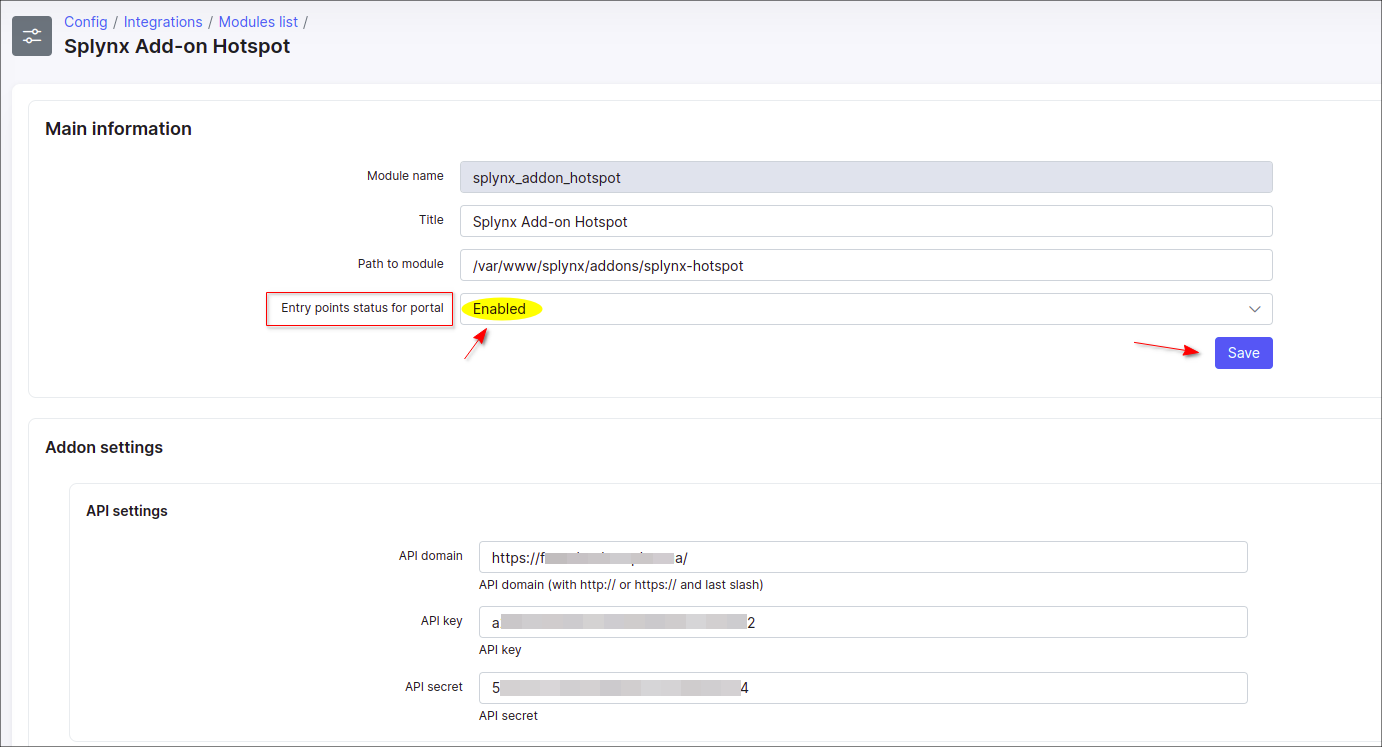
After the installation process has completed, you have to configure the HotSpot add-on, navigate to Config → Integrations → Modules list. Search for the splynx-hotspot add-on and click on the 

Main information and API settings:
-
API domain - api domain should be the same as the Splynx URL. The forward slash
/sign is required at the end; -
API key, API secret - auto generated default values. Don't change it unless it is absolutely necessary.
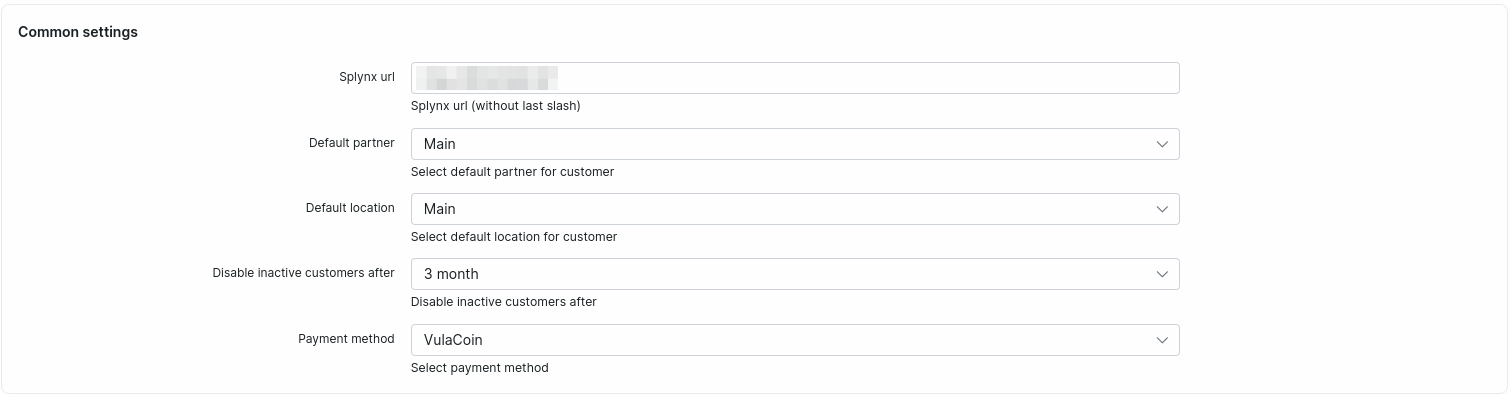
Common settings
-
Splynx url - your Splynx URL address without the forward slash
/sign at the end; -
Default partner - select the default partner for the created customer;
-
Default location - select the default location for the created customer;
-
Disable inactive customers after - select the period after that the customer will be disabled;
-
Payment method - select payment method.
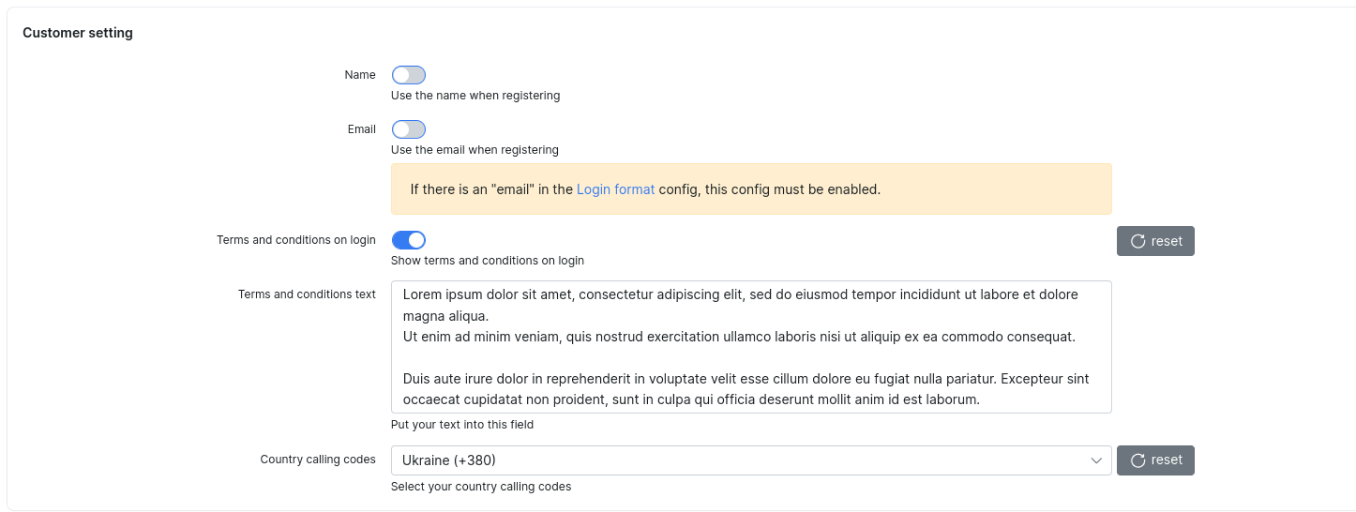
Customer setting
-
Name - enable/disable the use of the name field when registering a customer;
-
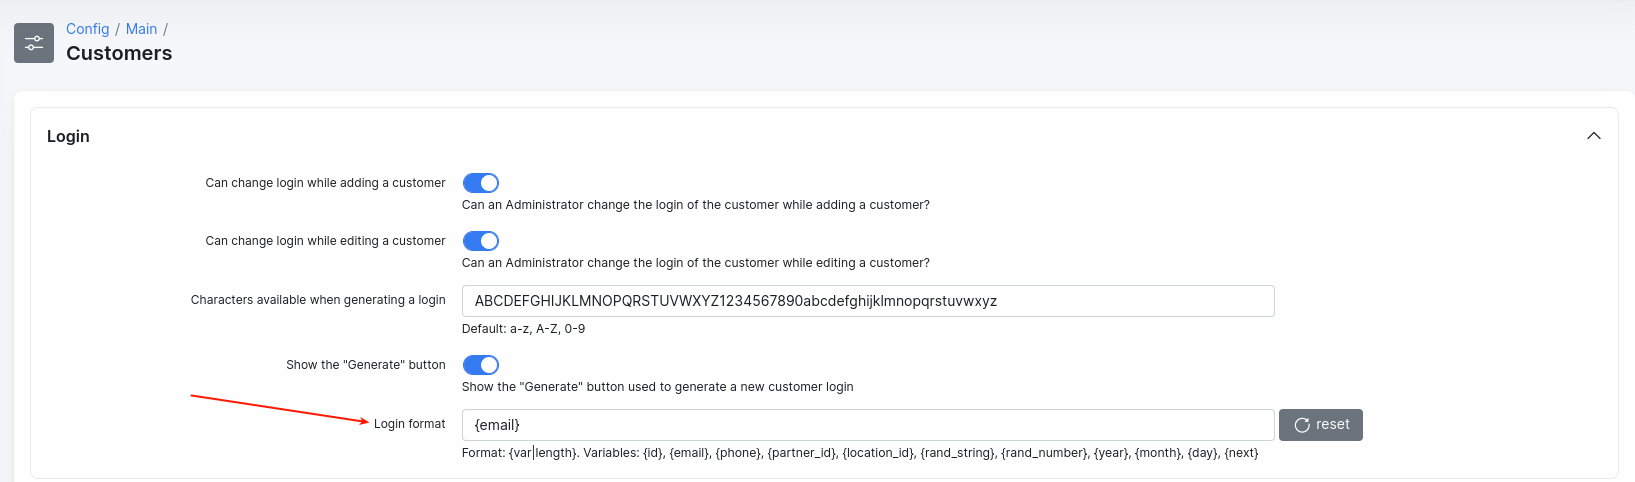
Email - enable/disable the use of the email field when registering a customer. If enabled, you should change the "Login format" under
Config/Main/Customersto "{email}":
-
Terms and conditions on login - enable/disable showing terms and conditions when signing in to HotSpot;
-
Terms and conditions text - enter the text of terms and conditions in this field;
-
Country calling codes - select a country phone code.
Note that changes are not saved until you click Save.
Confirm code setting

-
Code length - specify code length;
-
New code template - specify format of code message. Do not remove {code} variable from this field. You can use "{code} is your internet access code" as a possible option for this field;
-
Reset code template - specify format of reset code message. Do not remove {code} variable from this field.
The configuration of add-on Entry points can be found in Config → Integrations → Modules list, near the splynx_addon_hotspot module item in Actions column, click on the 
More information about Modules list can be found here.
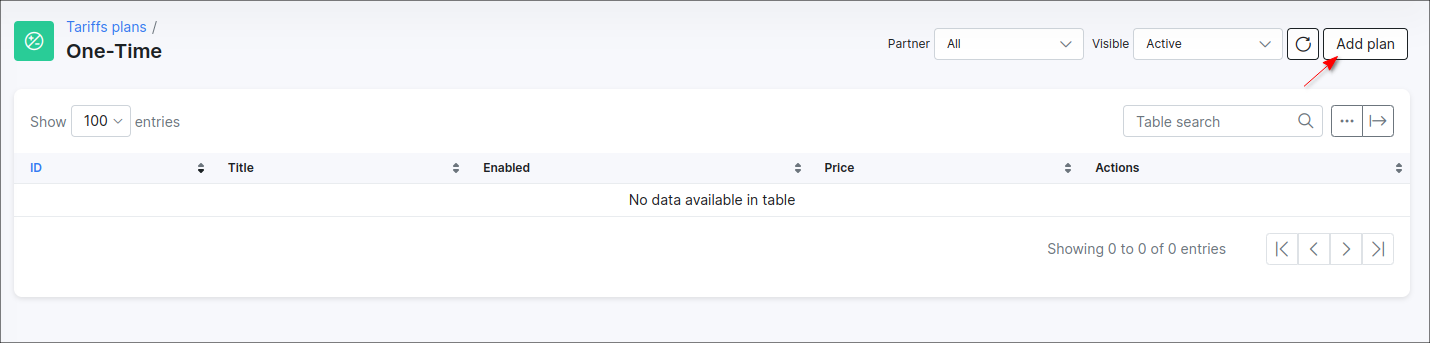
One-time Tariff Plans and Vouchers Configuration

To do so:
Navigate to Tariffs plans → One-Time at the top right, click the Add plan button:
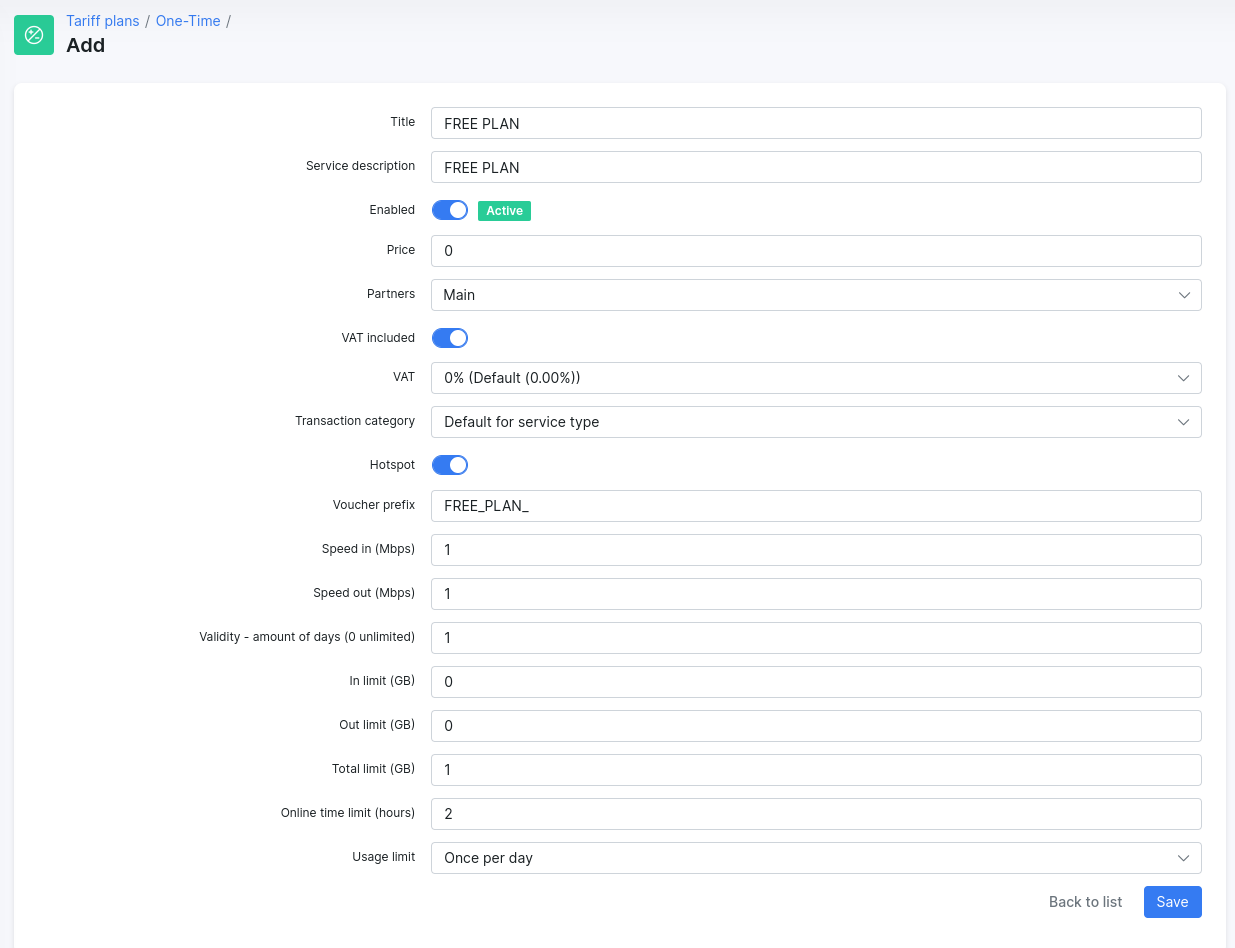
Add some plans which will be available for customers, for example:

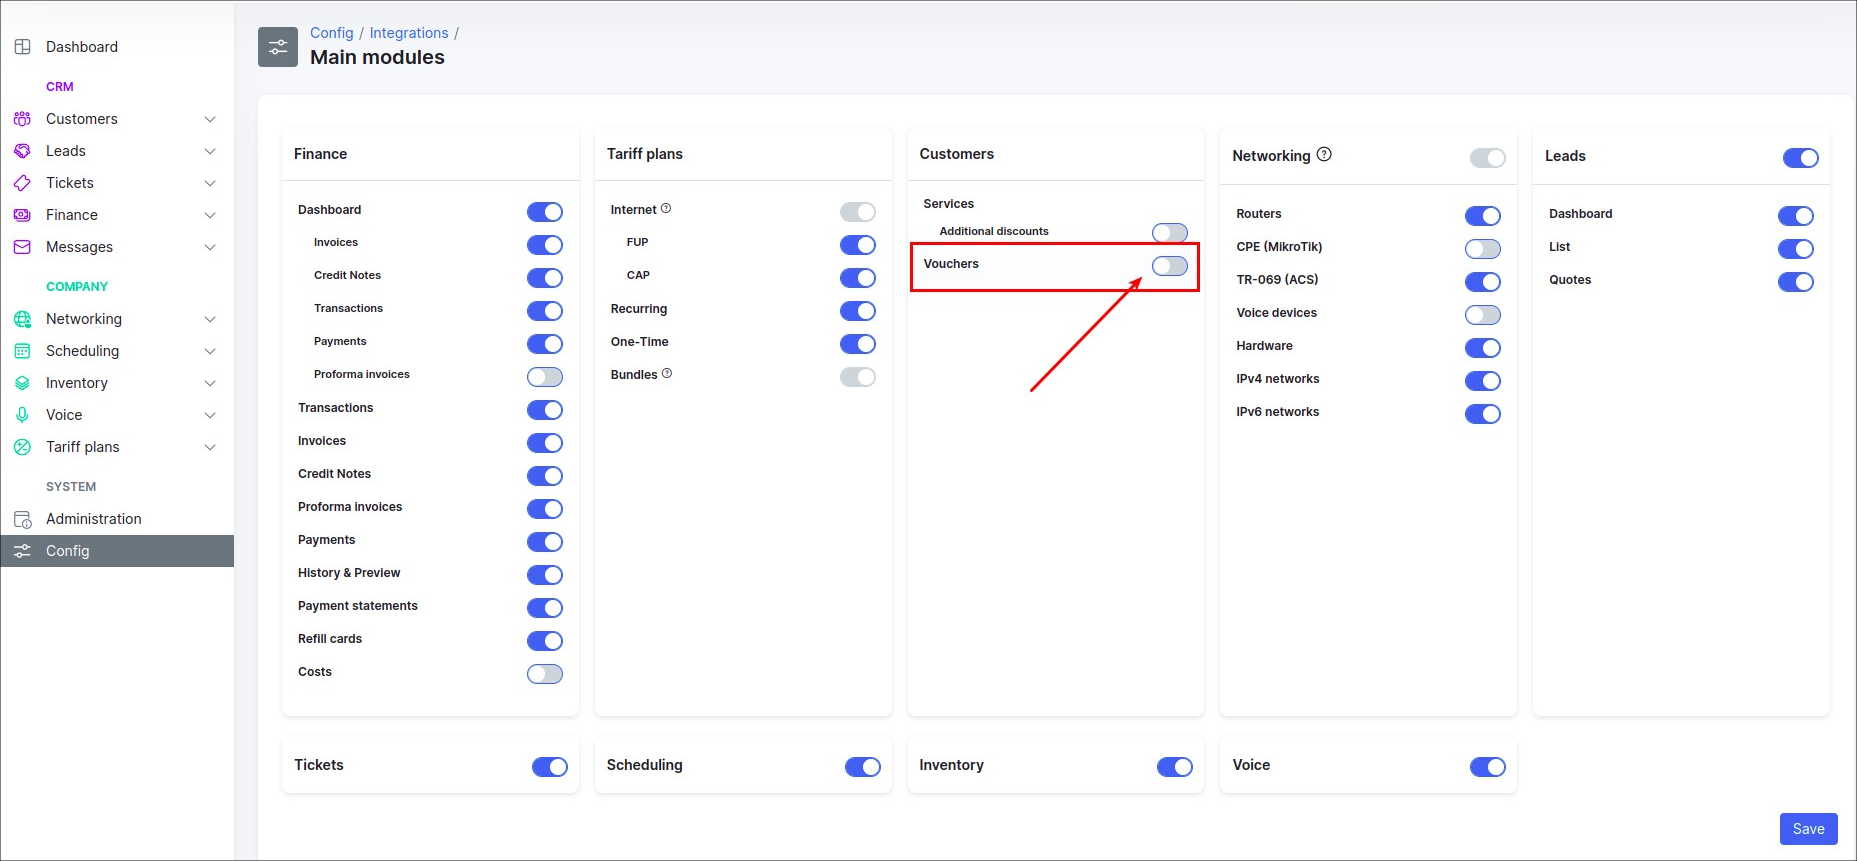
After that, navigate to Config → Integrations → Main modules and enable the Vouchers toggle and press Save:

HotSpot Configuration in MikroTik Router
Start by logging into your MikroTik router. Please make sure there is no previous configuration on the router before you start, as this configuration may conflict with the HotSpot setup.
Specifications:
We will use Splynx server (public domain and SSL are set) and Mikrotik hAP AC lite. Router (OpenVPN client - 10.250.32.2) will be connected with Splynx (OpenVPN server - 10.250.32.1) via OpenVPN.
In HotSpot will be used 10.5.50.0/24 network.
The Android-based cell phone will be a HotSpot client.
Suggested read: OpenVPN configuration.
Step 1 (optional, depends on your initial setup)
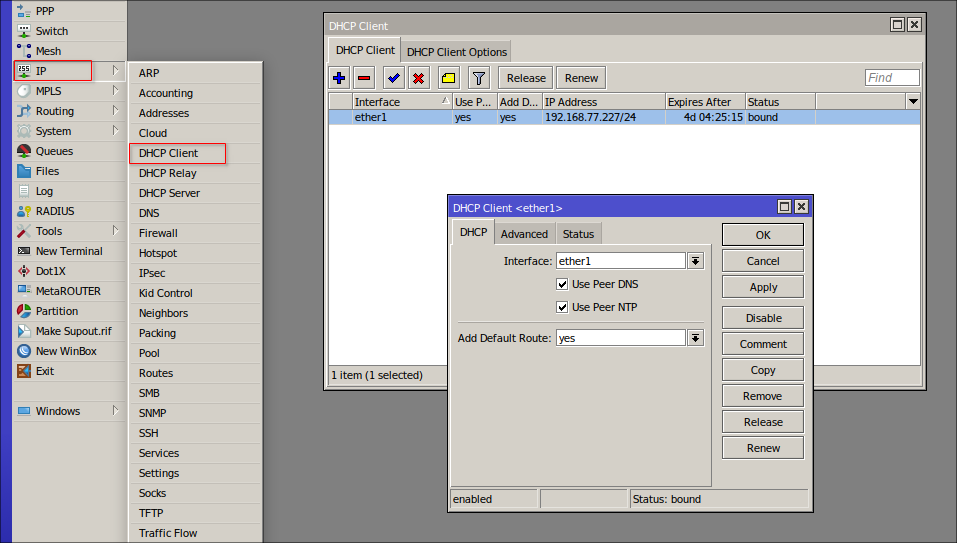
Define the port for WAN connection to connect to the Internet via DHCP. Navigate toIP → DHCP Client and add the DHCP Client, for example, to the ether1 interface:
Step 2 (optional but recommended)
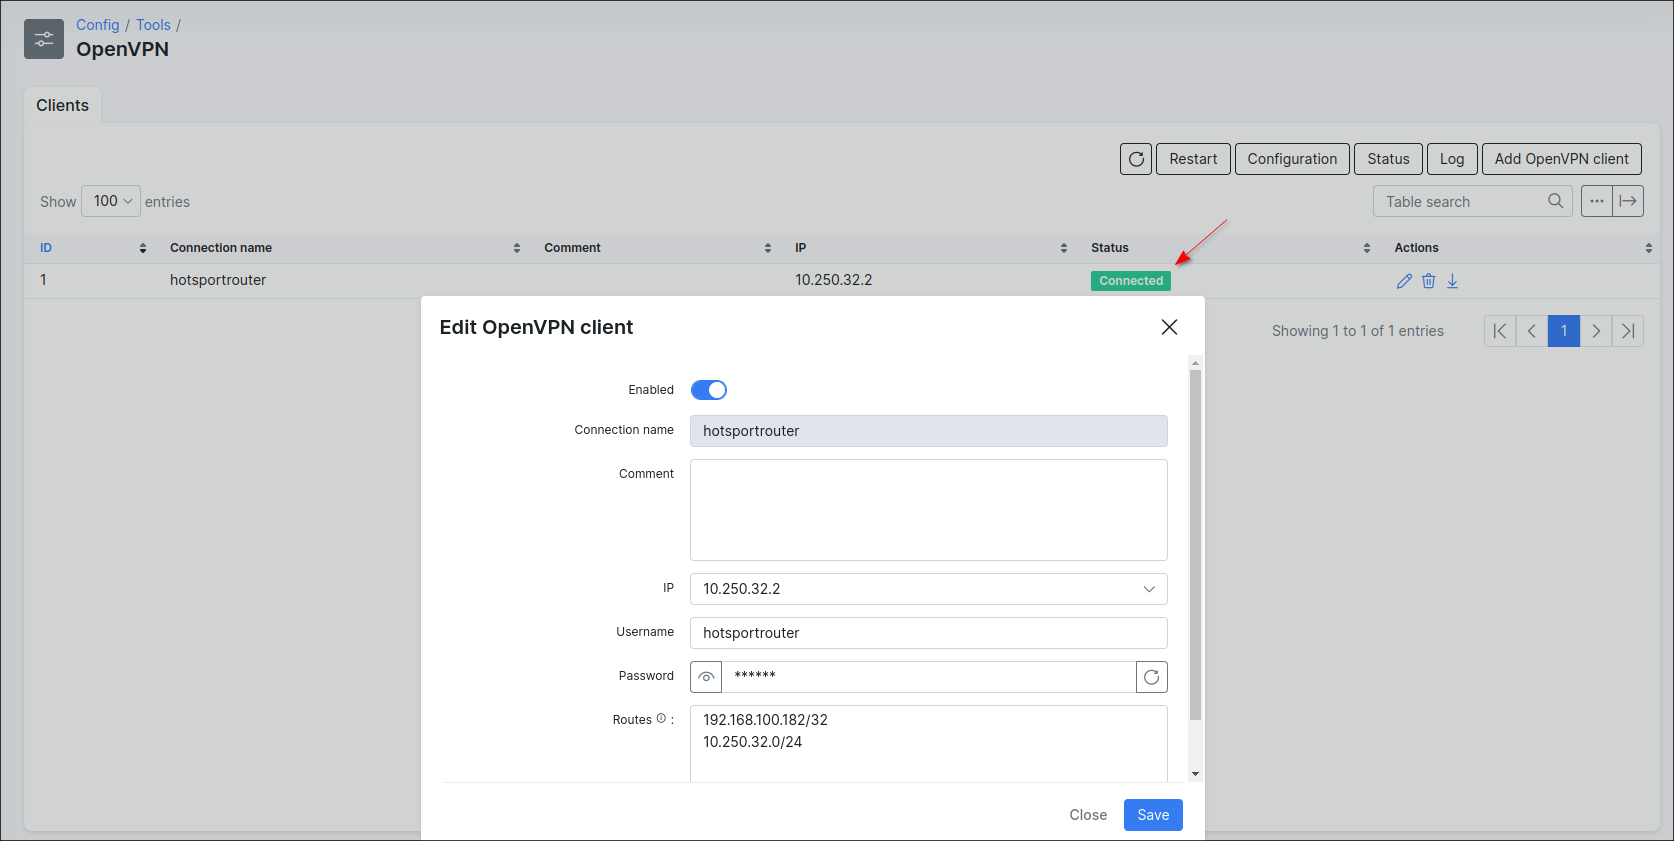
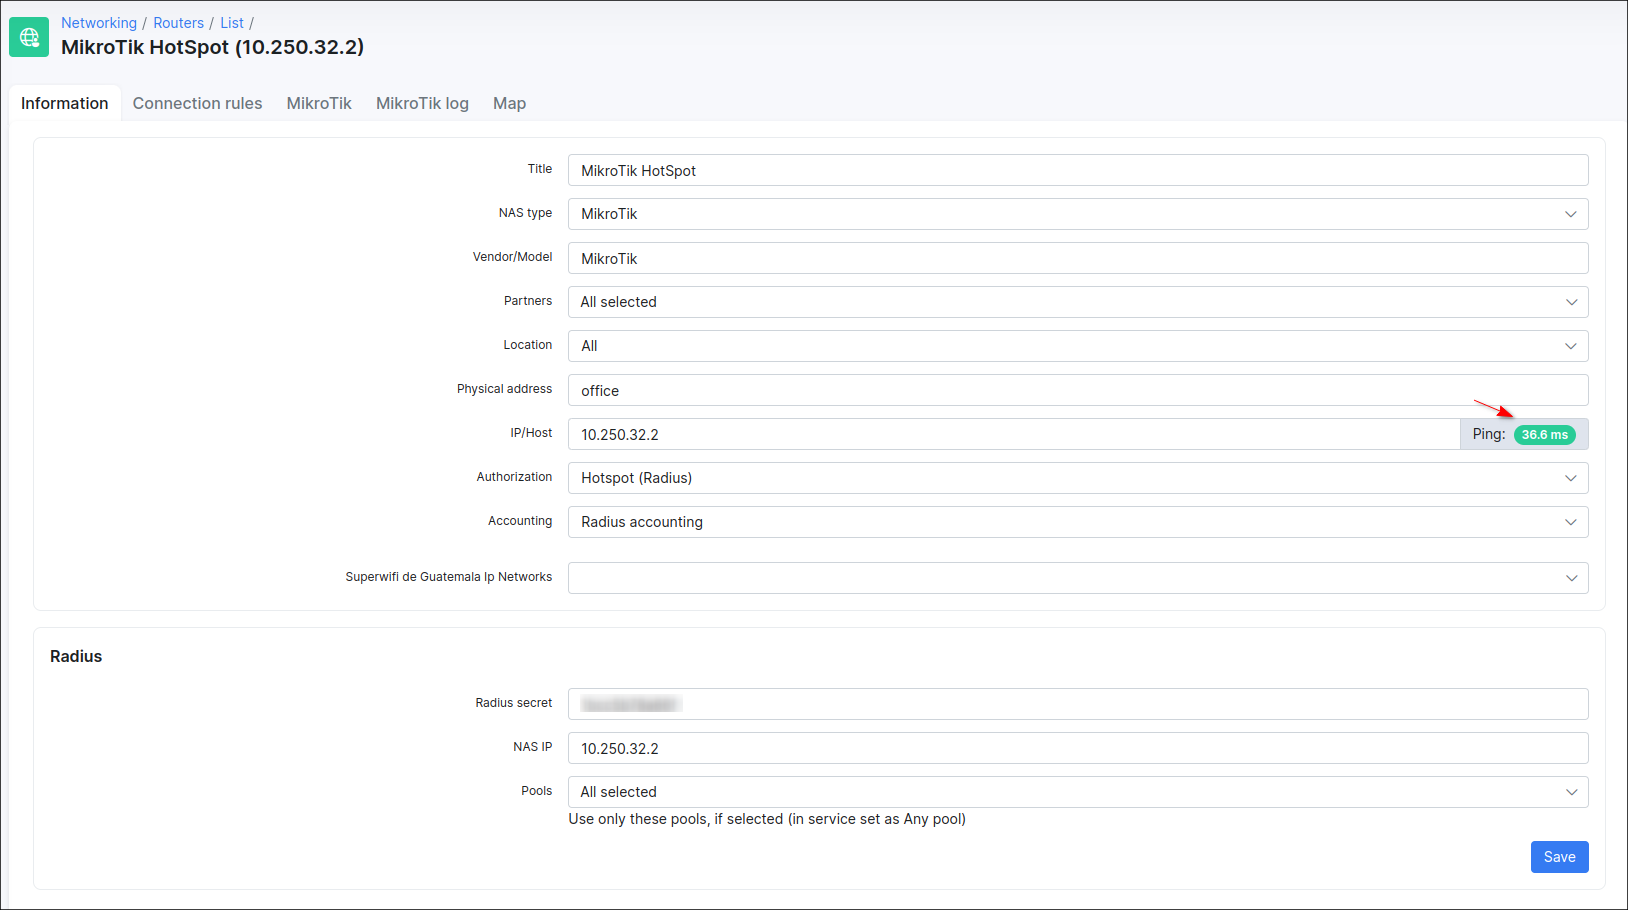
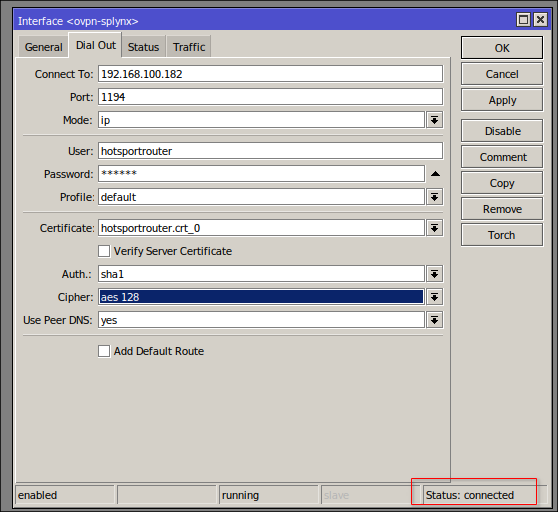
After the OpenVPN certificates are generated in Splynx and imported to MikroTik, add your router to Splynx and check the connection:


Step 3 (optional, depends on your initial setup)
Create two Bridges and combine the WLAN (wlan1, wlan2) and LAN (ether2-ether5) ports with the related bridges:


Step 4
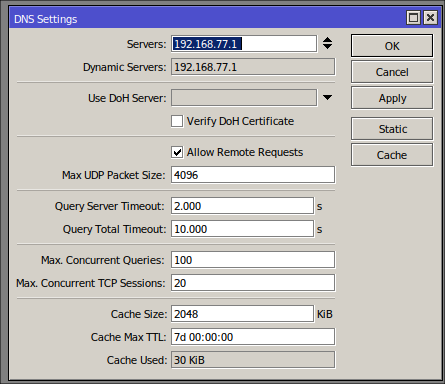
In IP → DNS specify the address of your DNS server. Put the check mark near the Allow Remote Requests option:
Step 5
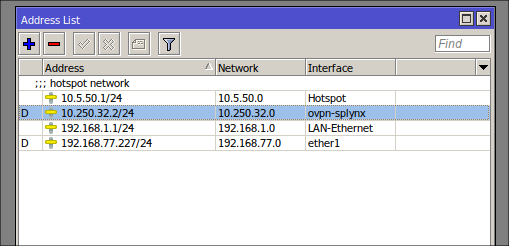
Assign new IP addresses to the HotSpot and LAN-Ethernet interfaces in IP → Addresses. The IP address can be anything you choose, but it must be in a range of IP addresses other than the IP address of the
DHCP server on the Internet. Remember to add /24 after the IP address - this is the sub-net range in which the interface will operate.
Step 6
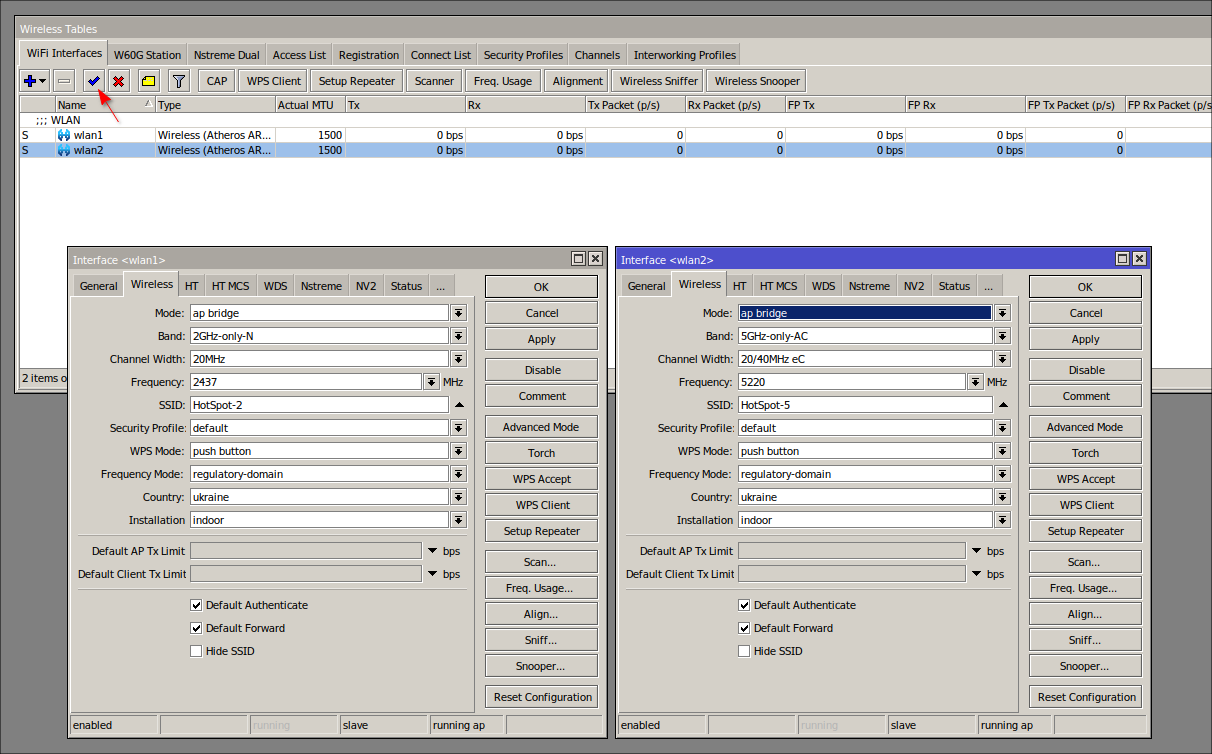
Enable Wi-Fi interfaces which will be used for HotSpot and configure them to accept wireless connections: use the AP Bridge mode, input the SSID (Wireless Name) name of your HotSpot, etc.
Step 7
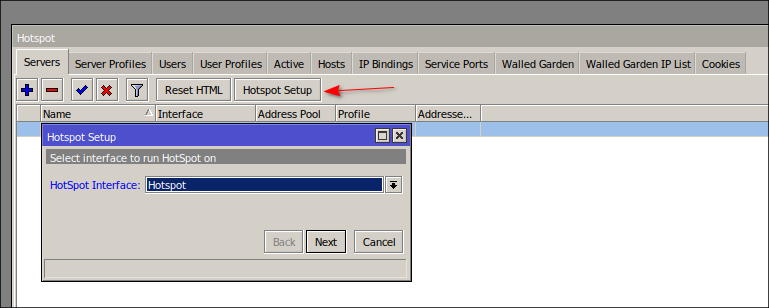
Now start making the HotSpot configuration, for this purpose use the HotSpot Setup wizard. Navigate to the menu IP → Hotspot → Hotspot Setup and perform the next steps:
- Choose which interface the HotSpot will run on, in our example it's the HotSpot bridge.
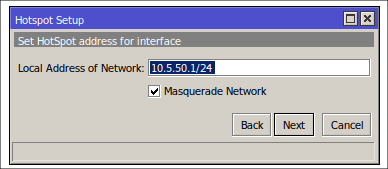
- The next window allows you to choose the local address range of your HotSpot. This will be filled in for you based on the IP address that you assigned to your bridge earlier. Make sure the Masquerade Network option is ticked.
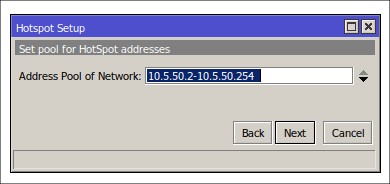
- Choose the IP address Pool for your HotSpot network. The value will be filled in automatically, it's based on the wireless interface IP address assigned earlier.
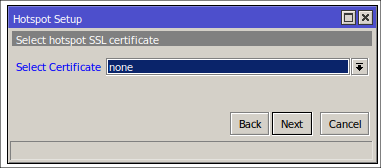
- In our example we are not going to use SSL/HTTPS certificates for HotSpot, so just leave the option set to
noneand press Next.
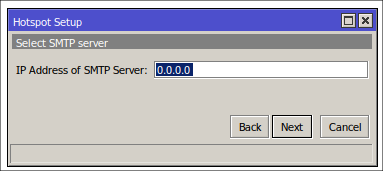
- In our example we don't need SMTP server, so just leave the address as
0.0.0.0.
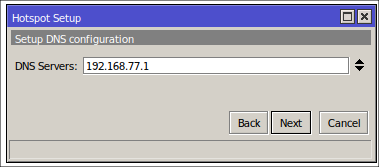
- The DNS address will be filled in automatically based on our previous configuration.
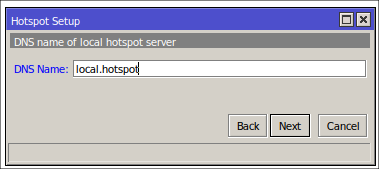
- In the field type, e.g.
local.hotspot, this is the address that HotSpot clients will be redirected to when they want to login. Make sure that this site is not accessible on the Internet (do not use, for example,yahoo.com), and the address must include a dot sign in the name.
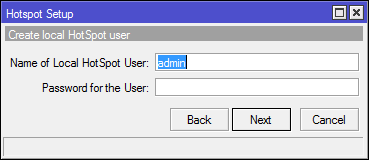
In this window you can create your first HotSpot username and password, but we'll leave it as it is (don't set any password).
After that the HotSpot server will be created:
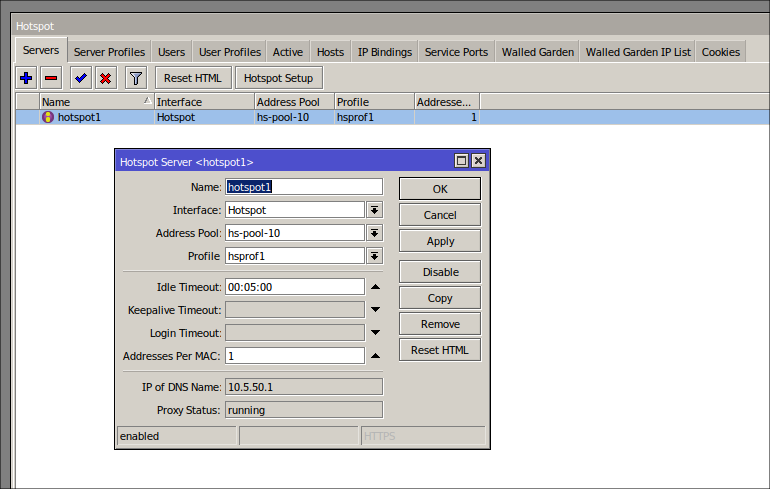
Step 8
The next step is to replace the default login.html file on the router storage to our customized one:
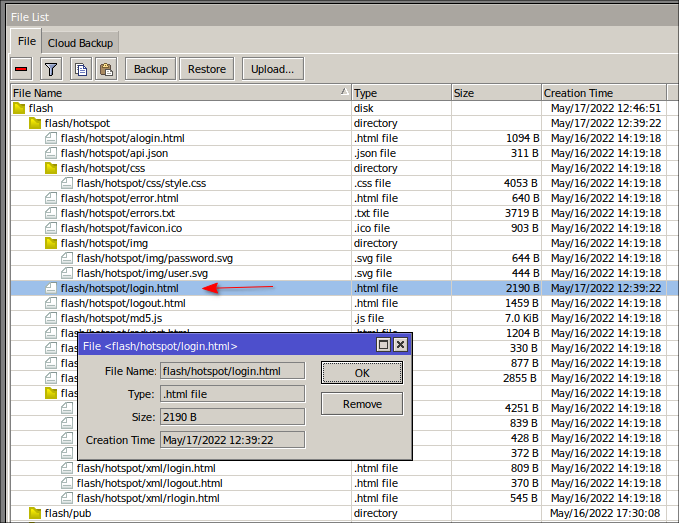
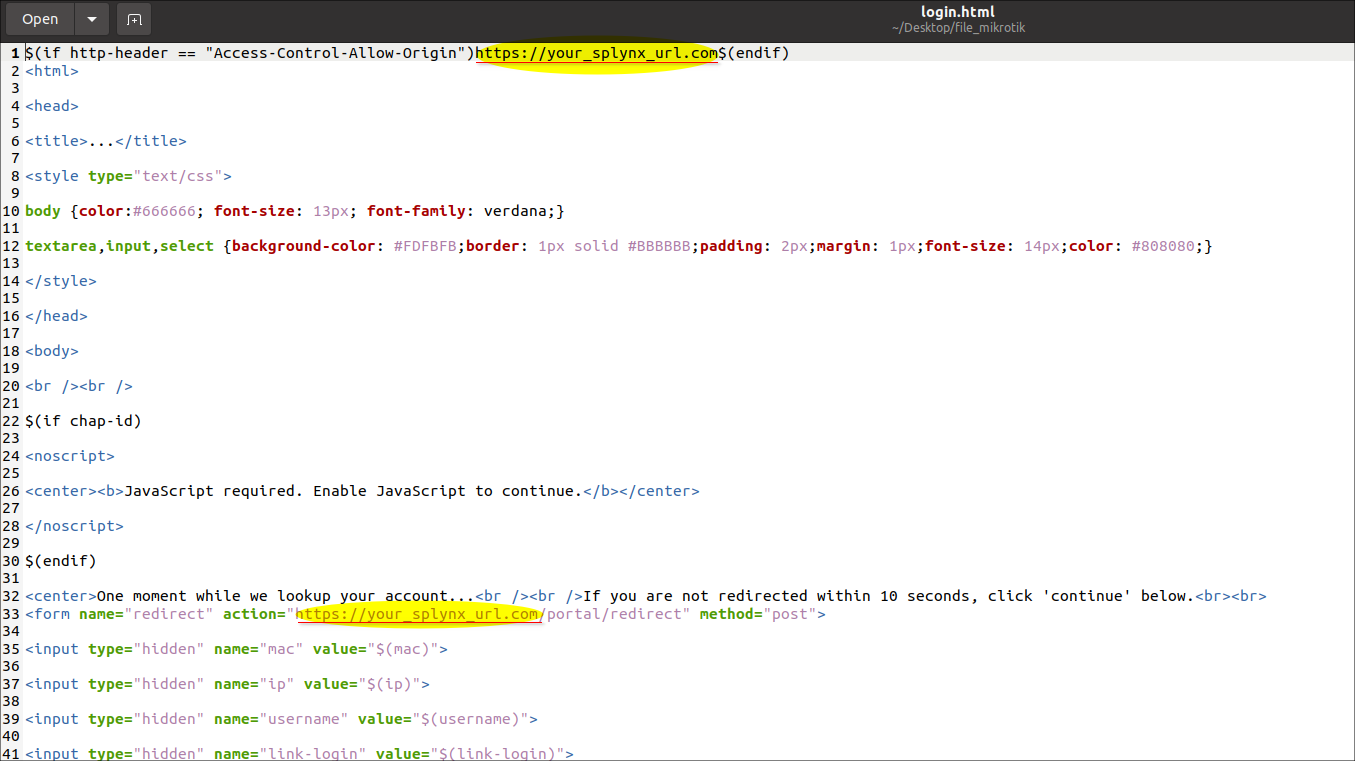
But first of all, you need to download the configured html file and change the URL address of Splynx to your own:
Step 9
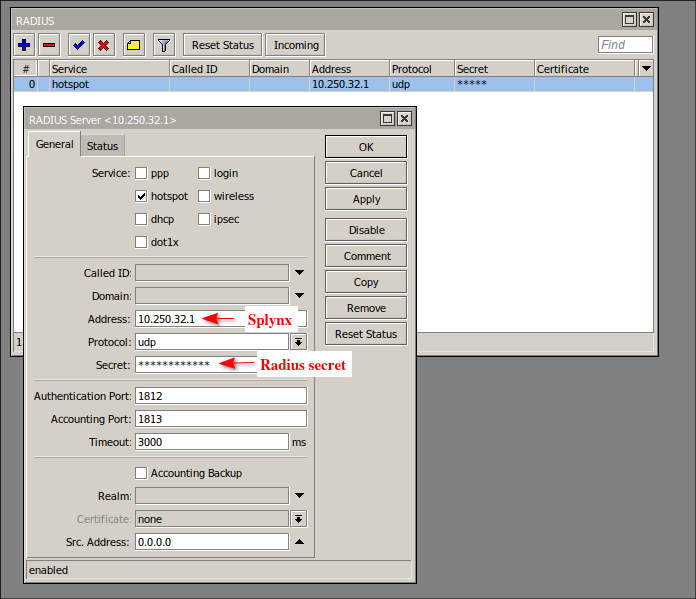
The clients authorization uses the RADIUS protocol. Let's configure the interaction between the router and the service by adding a new server to the RADIUS menu, after that make its configuration:
- Service:
hotspot; - Address:
your Splynx IP address; - Protocol:
udp; - Secret:
automatically generated value from your router page in Splynx; - Authentication Port:
1812; - Accounting Port
1813; - Timeout:
3000
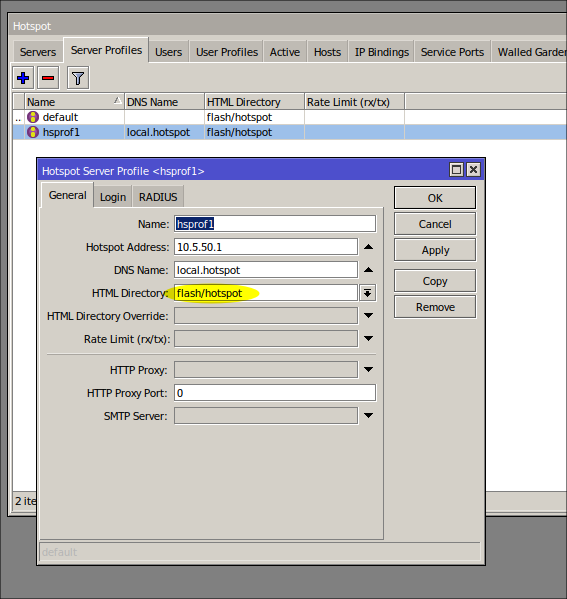
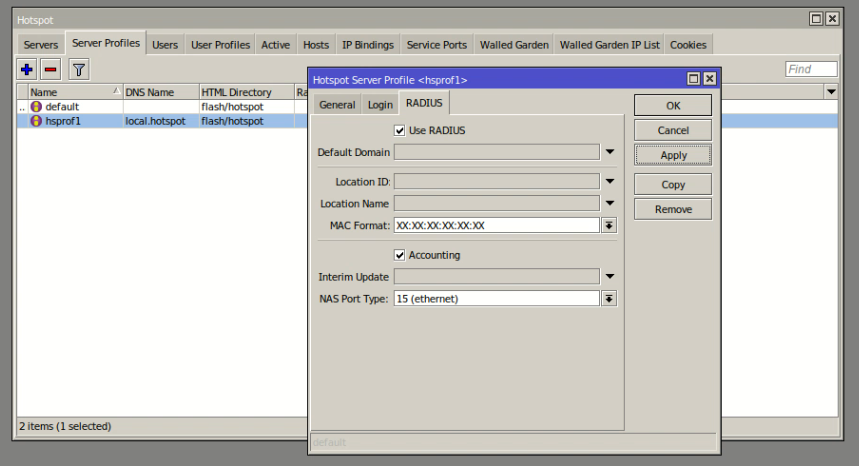
Then, navigate to IP → Hotspot → Server Profiles, double click on your HotSpot profile and click on the RADIUS tab, make the next changes:
- Use RADIUS - put the check-mark to enable this setting;
- MAC Format - use the default value (
XX:XX:XX:XX:XX:XX); - Accounting - put the check-mark to enable this setting;
- NAS Port Type - select the
15 (ethernet)value.
Step 10
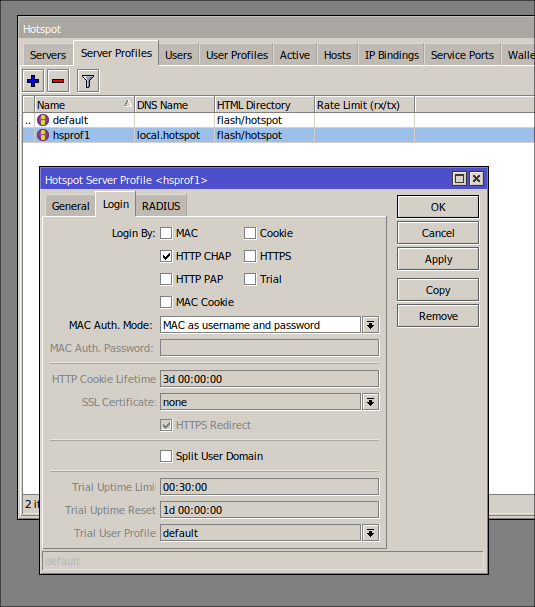
Set the correct parameters on the Login tab for the HotSpot Server Profile:
- Login By:
HTTP CHAP; - MAC Auth. Mode:
MAC as username and password.
Step 11
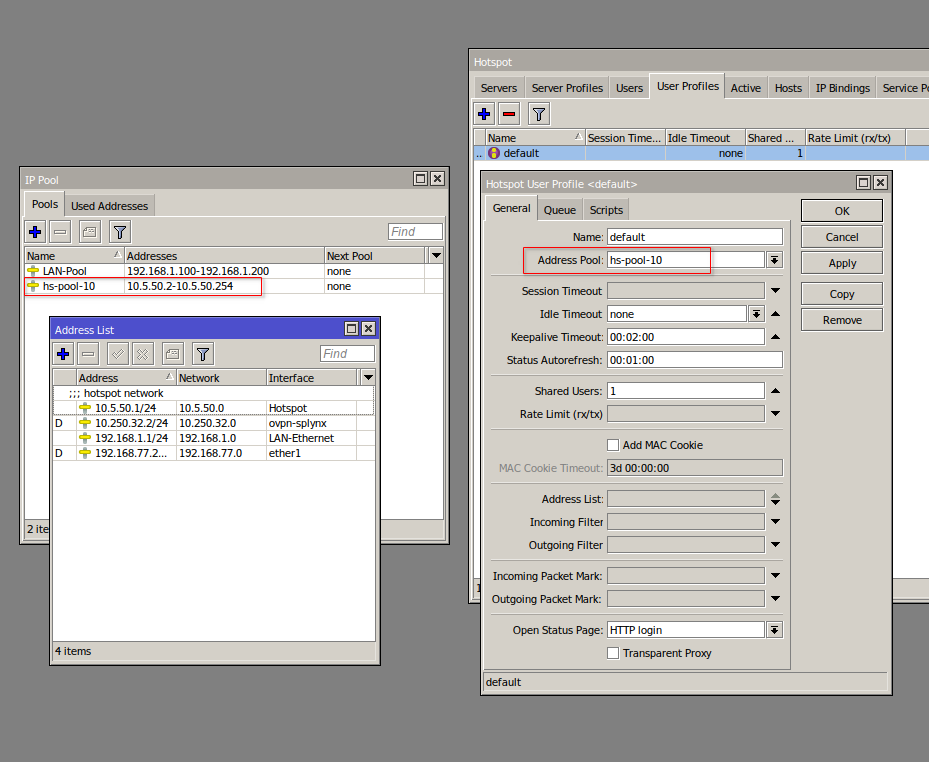
In IP → Hotspot → User Profiles, the default profile should be with the next settings:
Step 12
In IP → Hotspot → Walled Garden, configure the following addresses to Dst. Address one by one for access by unauthorized clients, where:
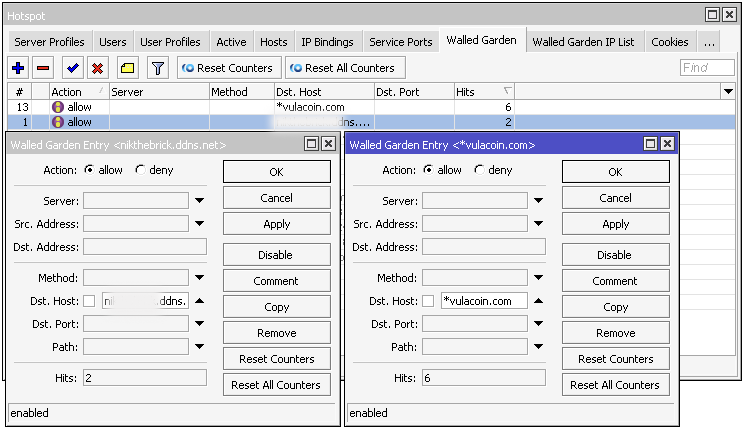
-
192.168.100.182- IP address of your Splynx server behind NAT; -
https//:|www., etc.), for example if we have the addresshttps://www.portal.mysplynx.com/, onlyportal.mysplynx.comshould be used; -
*vulacoin.com- URL of VulaCoin service; -
netcash.co.za- URL of Netcash service.
Full list of walled garden entries to add (required for Netcash integration only):
/ip hotspot walled-garden
add comment=Netcash dst-host=cde.netcash.co.za dst-port=443 path=\
    /Site/CardPayment.aspx
add comment=Netcash dst-host=js-agent.newrelic.com dst-port=443 path=\
    /nr-spa-1216.min.js
add comment=Netcash dst-host=seal.digicert.com
add comment=Netcash dst-host=*.netcash.co.za
add comment=Netcash dst-host=*.digicert.com
add comment=Netcash dst-host=*.newrelic.com
add comment=Netcash dst-host=js-agent.newrelic.com
add comment=Netcash dst-host=netdna.bootstrapcdn.com
add comment=Netcash dst-host=netcashcde.azurewebsites.net
add comment=Netcash dst-host=*.ozow.com
add comment=Netcash dst-host=*.azurefd.net
add comment=Netcash dst-host=*.trafficmanager.net
add comment=Netcash dst-host=*.msedge.net
add comment=Netcash dst-host=*.hostserv.co.za
add comment=Netcash dst-host=*.paynow.co.za
add dst-host=*.microsoft.com
add dst-host=*.awsglobalaccelerator.com
add dst-host=*.cloudflare.net
add dst-host=*.cardinalcommerce.com
add dst-host=*.paygate.co.za
add dst-host=*.cloudfront.net
add dst-host=*.dpopayments.io
add dst-host=*.dpopayments.io
add dst-host=*.fnb*
add dst-host=*.standardbank.*
add dst-host=*.capitec.*
add dst-host=*.absa.*
add dst-host=*.nedbank.*
add dst-host=authentication.cardinalcommerce.com/ThreeDSecure/
add dst-host=3ds.capitecbank.co.za/acs/
add dst-host=acsabsa.bankserv.co.za
add dst-host=acsnedcor.bankserv.co.za
add dst-host=acssb.bankserv.co.za
/ip hotspot walled-garden ip
add action=accept disabled=no dst-address=151.101.2.137 !dst-address-list \
    !dst-port !protocol !src-address !src-address-list
add action=accept disabled=no dst-address=151.101.66.137 !dst-address-list \
    !dst-port !protocol !src-address !src-address-list
add action=accept disabled=no dst-address=151.101.130.137 !dst-address-list \
    !dst-port !protocol !src-address !src-address-list
add action=accept disabled=no dst-address=151.101.194.137 !dst-address-list \
    !dst-port !protocol !src-address !src-address-list
add action=accept disabled=no dst-address=185.221.86.0/23 !dst-address-list \
    !dst-port !protocol !src-address !src-address-list
add action=accept disabled=no dst-address=99.81.96.137 !dst-address-list \
    !dst-port !protocol !src-address !src-address-list
add action=accept disabled=no dst-address=52.0.0.0/8 !dst-address-list \
    !dst-port !protocol !src-address !src-address-list
add action=accept disabled=no dst-address=102.133.154.32 !dst-address-list \
    !dst-port !protocol !src-address !src-address-list
add action=accept disabled=no dst-address=40.127.3.0/24 !dst-address-list \
    !dst-port !protocol !src-address !src-address-list
add action=accept disabled=no dst-address=40.127.0.0/24 !dst-address-list \
    !dst-port !protocol !src-address !src-address-list
add action=accept disabled=no dst-address=41.21.175.145 !dst-address-list \
    !dst-port !protocol !src-address !src-address-list
add action=accept disabled=no dst-address=13.107.246.0/24 !dst-address-list \
    !dst-port !protocol !src-address !src-address-list
add action=accept disabled=no dst-address=75.2.62.89 !dst-address-list \
    !dst-port !protocol !src-address !src-address-list
add action=accept disabled=no dst-address=99.83.232.8 !dst-address-list \
    !dst-port !protocol !src-address !src-address-list
add action=accept disabled=no dst-address=13.73.248.8/29 !dst-address-list \
    !dst-port !protocol !src-address !src-address-list
add action=accept disabled=no dst-address=13.107.192.0/18 !dst-address-list \
    !dst-port !protocol !src-address !src-address-list
add action=accept disabled=no dst-address=104.18.40.135 !dst-address-list \
    !dst-port !protocol !src-address !src-address-list
add action=accept disabled=no dst-address=172.64.147.121 !dst-address-list \
    !dst-port !protocol !src-address !src-address-list
add action=accept disabled=no dst-address=198.217.251.0/24 !dst-address-list \
    !dst-port !protocol !src-address !src-address-list
add action=accept disabled=no dst-address=18.0.0.0/8 !dst-address-list \
    !dst-port !protocol !src-address !src-address-list
add action=accept disabled=no dst-address=99.80.231.39 !dst-address-list \
    !dst-port !protocol !src-address !src-address-list
add action=accept comment=api.dpopayments.io disabled=no dst-address=\
    46.137.27.229 !dst-address-list !dst-port !protocol !src-address \
    !src-address-list
add action=accept disabled=no dst-address=3.248.100.28 !dst-address-list \
    !dst-port !protocol !src-address !src-address-list
add action=accept disabled=no dst-address=63.34.141.3 !dst-address-list \
    !dst-port !protocol !src-address !src-address-list
add action=accept disabled=no dst-address=34.0.0.0/8 !dst-address-list \
    !dst-port !protocol !src-address !src-address-list
add action=accept disabled=no dst-address=54.0.0.0/8 !dst-address-list \
    !dst-port !protocol !src-address !src-address-list
This text can be copied and pasted into the terminal on your Mikrotik device.
You should replace YOURSPLYNXPUBLICIP with your server’s public IP and YOURSPLYNXURL with your server’s URL. You should also replace YOURSPLYNXINTERNALIP with your internal IP if your server is behind NAT.
/ip hotspot walled-garden ip
add action=accept comment=Splynx disabled=no dst-address=YOURSPLYNXPUBLICIP \
    !dst-address-list !dst-port !protocol !src-address !src-address-list
add action=accept comment=Splynx disabled=no dst-address=YOURSPLYNXINTERNALIP \
    !dst-address-list !dst-port !protocol !src-address !src-address-list
/ip hotspot walled-garden
add dst-host=*.YOURSPLYNXURL
Step 13
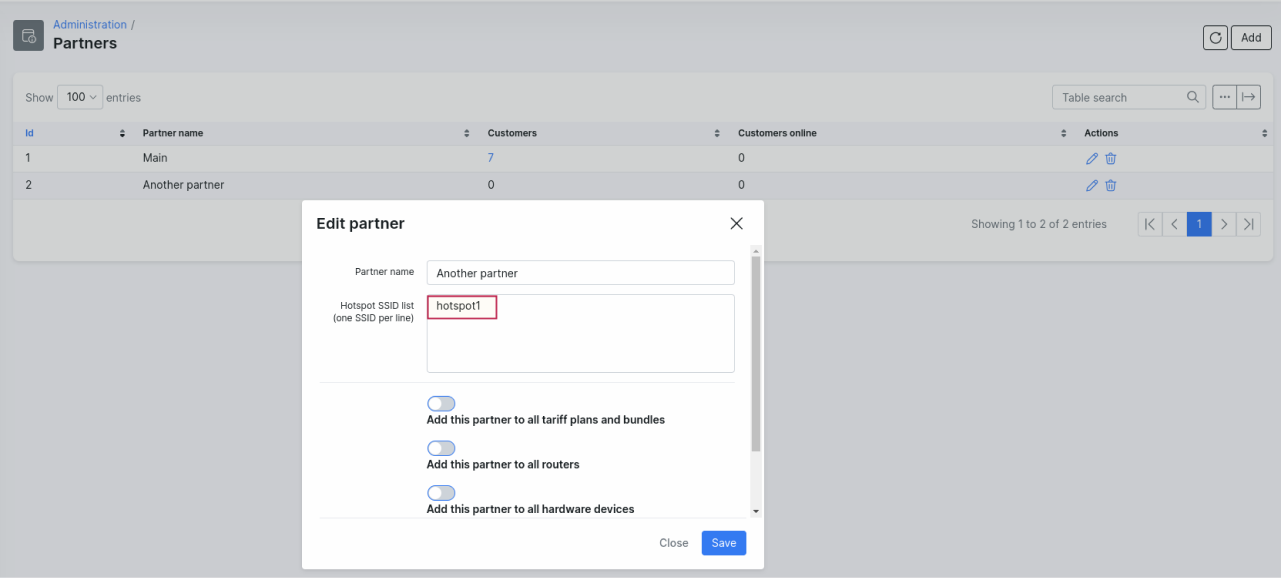
Under Administration -> Partners click on the "Edit" button on a partner and set Hotspot server name or SSID (depends on device vendor) to which customers of this partner will connect.
When editing a partner, in Hotspot SSID list field, enter the following:
-
for Mikrotik devices: enter Hotspot server name;
-
for Cambium devices: enter SSID name.

Make sure each partner who uses the Hotspot add-on has a correct hotspot name here:
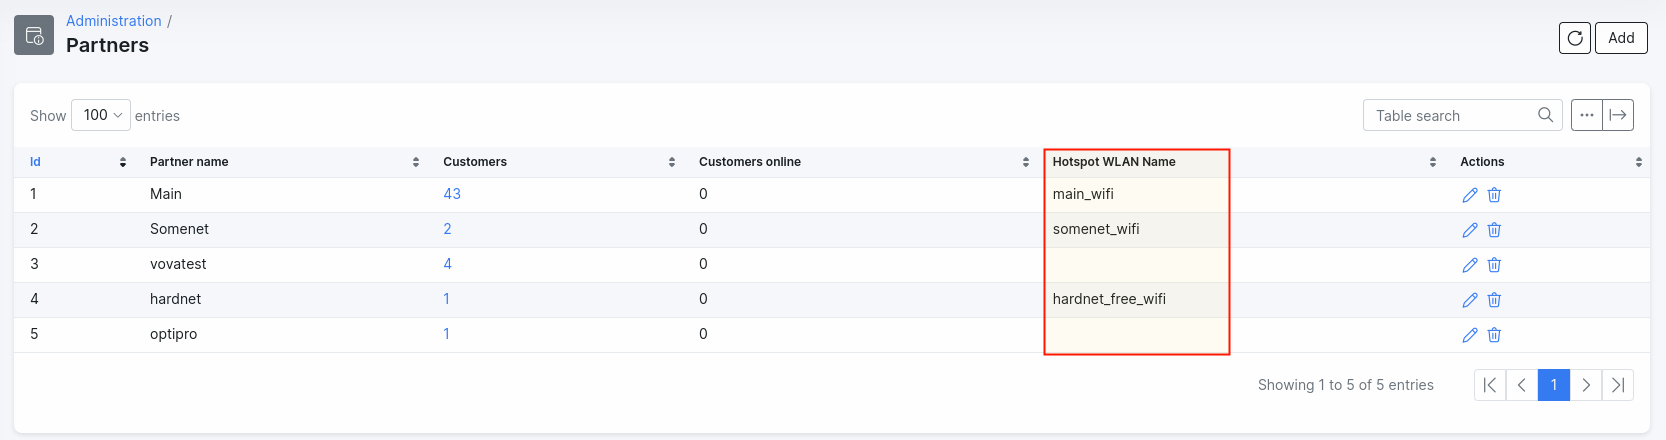
It is crucial when each partner has its own branding (logo under Company information). In case when real SSID does not match hotspot name in this field, the system will load a logo of default partner.
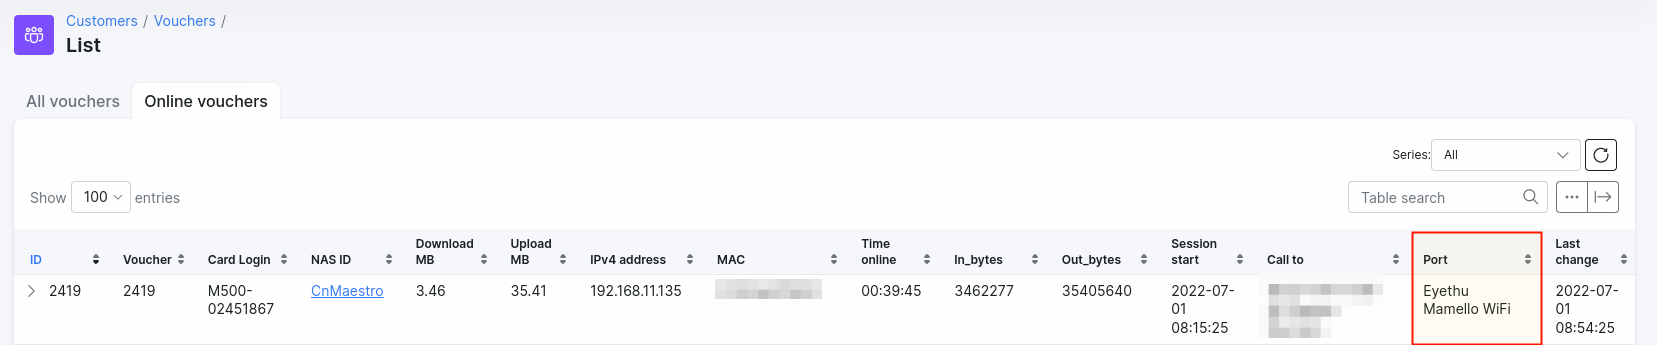
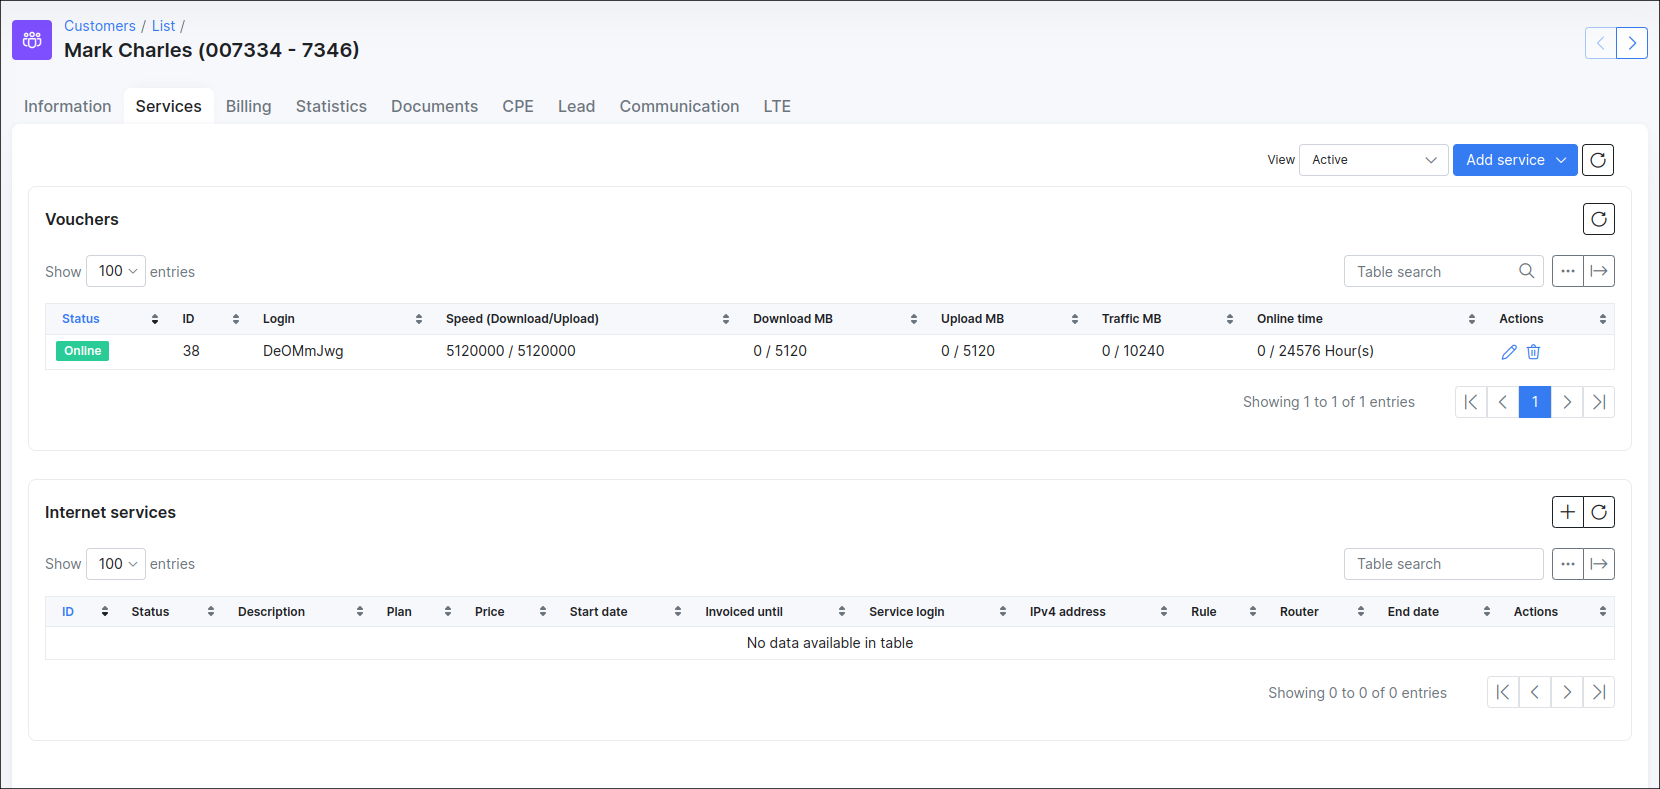
You can check a real SSID name of connected customers under Customers -> Vouchers -> List on a tab Online vouchers under the field "Port":
Connection to HotSpot and Payments via VulaCoin
Imitating the client's steps, try to connect to the newly created Wi-Fi HotSpot:
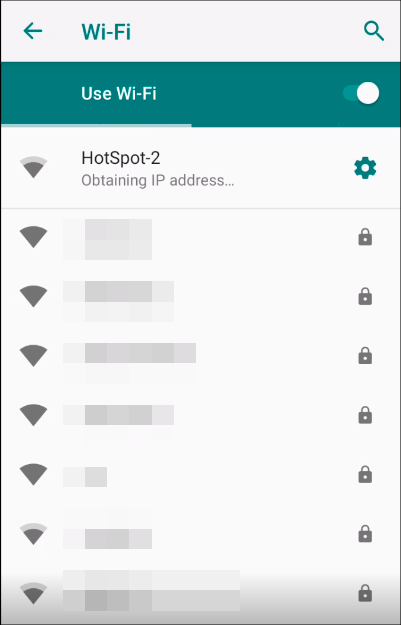
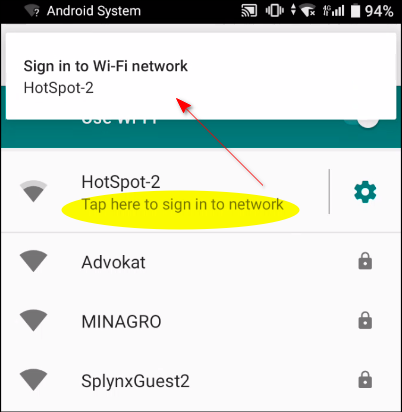
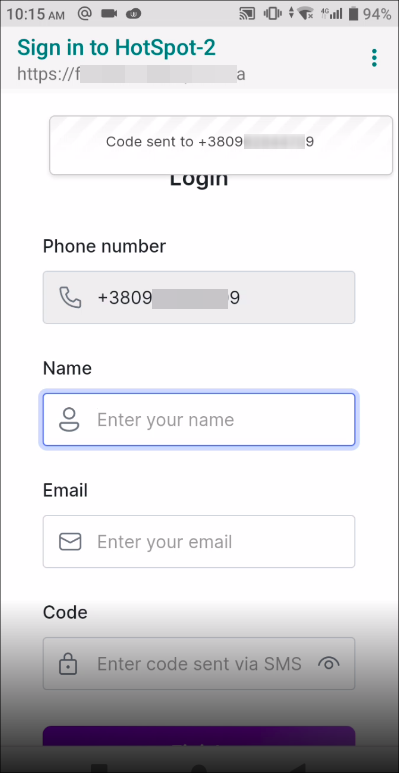
To sign in to your HotSpot, enter your phone number and press Next.

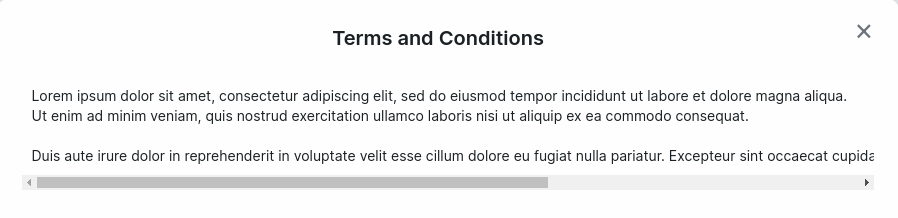
If there are terms and conditions on login, accept them to proceed. You can click on terms and conditions phrase under the phone number field and see the text like this:

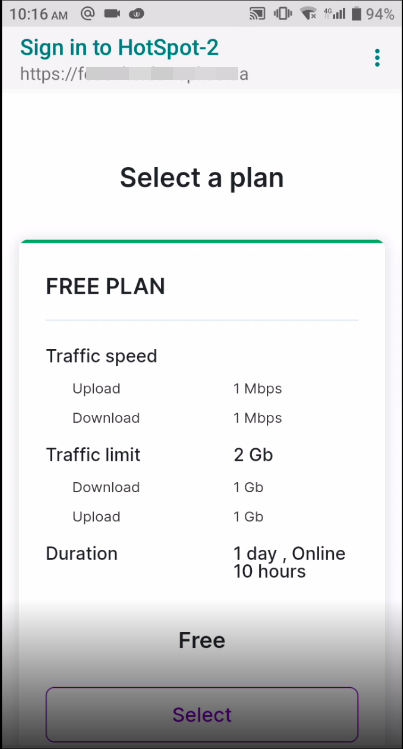
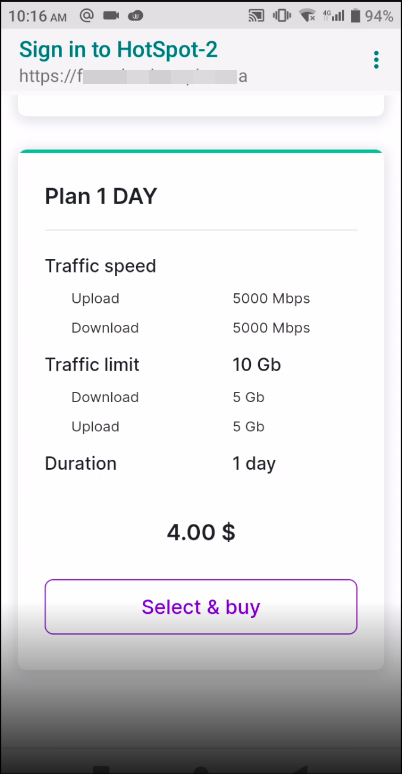
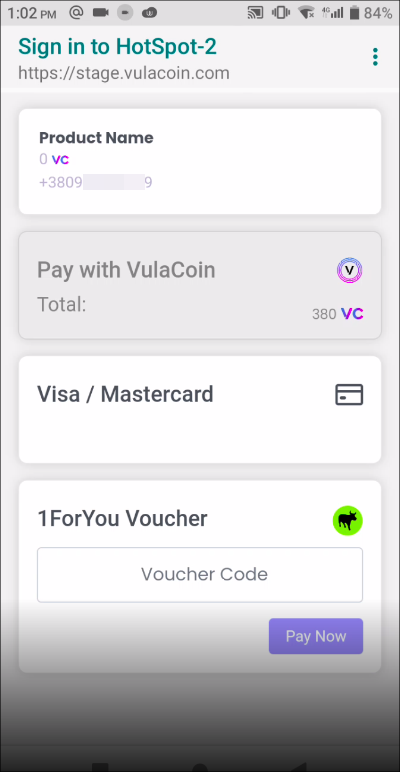
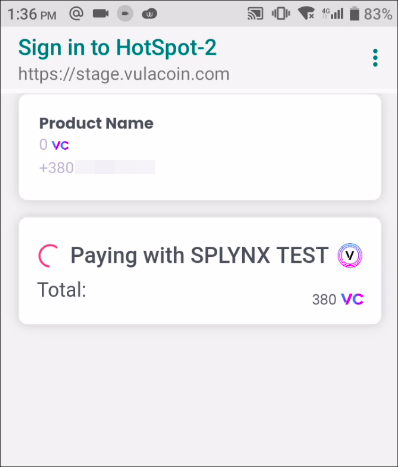
Then, select your plan. In case the plan is paid you will be redirected to the VulaCoin page to make payment:

Logs
You can check a Hotspot logs under Administration -> Logs -> Hotspot Logs:
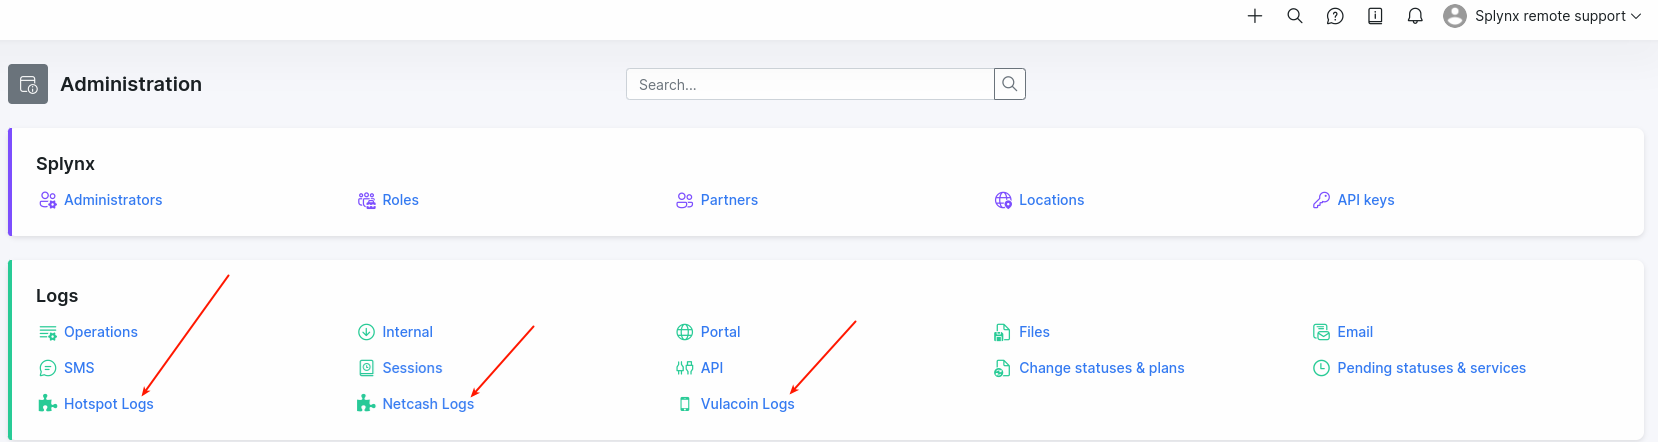
Also there is an option to check Netcash and/or Vulacoin logs here.